Where can I find the video on modifying an Epson 3880 printer to print without star wheel marks?
I don’t think they’ve made it yet, but have you tried using the front feed? I’ve been using the front feed for digital negatives on a 3880 and before that on a 3800 for years and do not have star-wheel marks. I’ve heard some people have difficulty getting it to accept some films, but I’ve never had an issue with Pictorico.
Thanks. I’ll give it a try.
I’ve just set up a 3880 for use with PiezoDN. Thanks to a couple of hints from Walker and the Service Manual, I’ve got this step-wheel thing figured out. It’s not too difficult, and it’s not permanent (unlike the modification to the 1430). Illustrations will help and I’m working on that now. I’ll post details ASAP.
The key to avoiding the star-wheels is to open the front-feed which lifts the Eject Assembly Frame on which the star-wheels are mounted about 1/2 inch above the paper eject path, but trick the printer into thinking that it is closed and actually using the manual rear feed. Your paper, or transparency film in our case, will enter using the manual rear path, but exit using the front feed path.
- Open the Paper Eject Tray Cover.
- Open the Front Feed Tray.
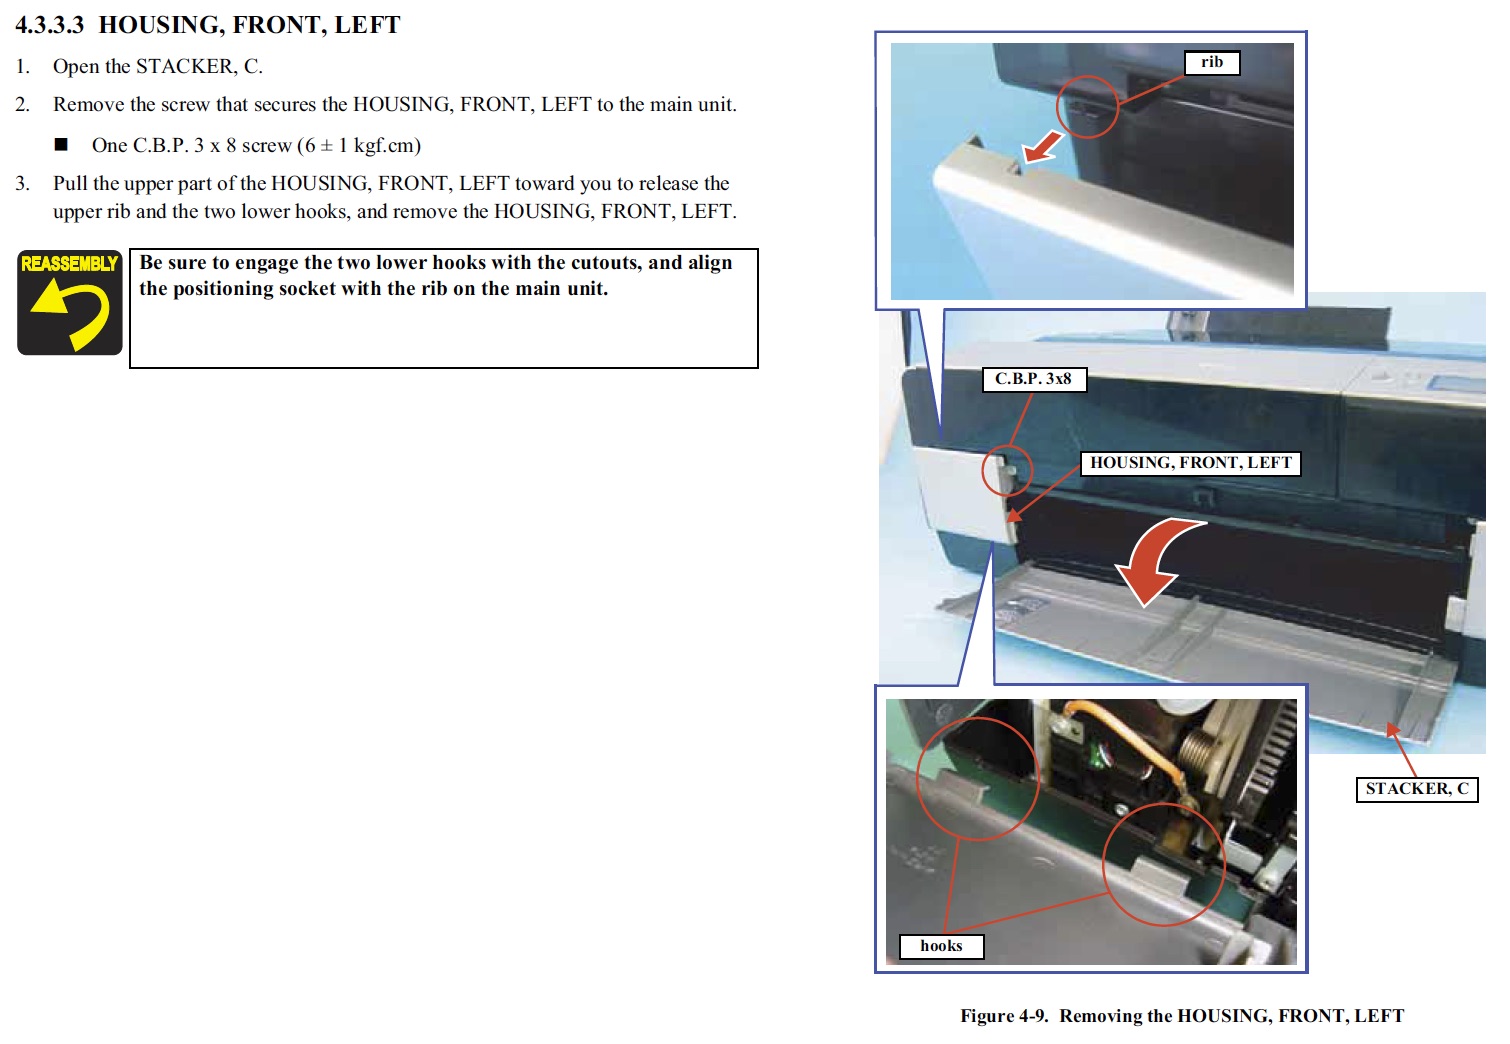
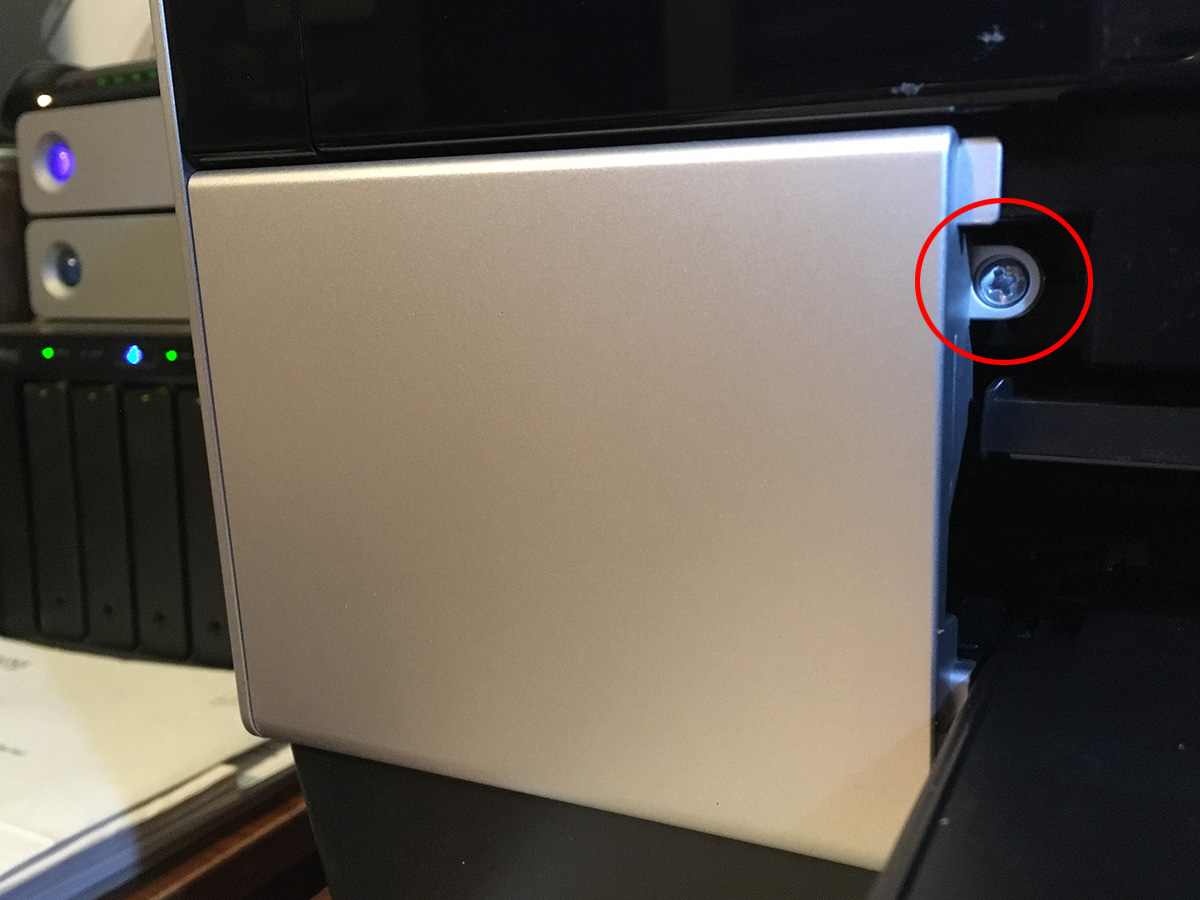
- On the left side you will see the Front Left Housing Cover which is secured by one screw at the upper right.
- Remove the screw, tilt the cover towards you from the top, and remove it.
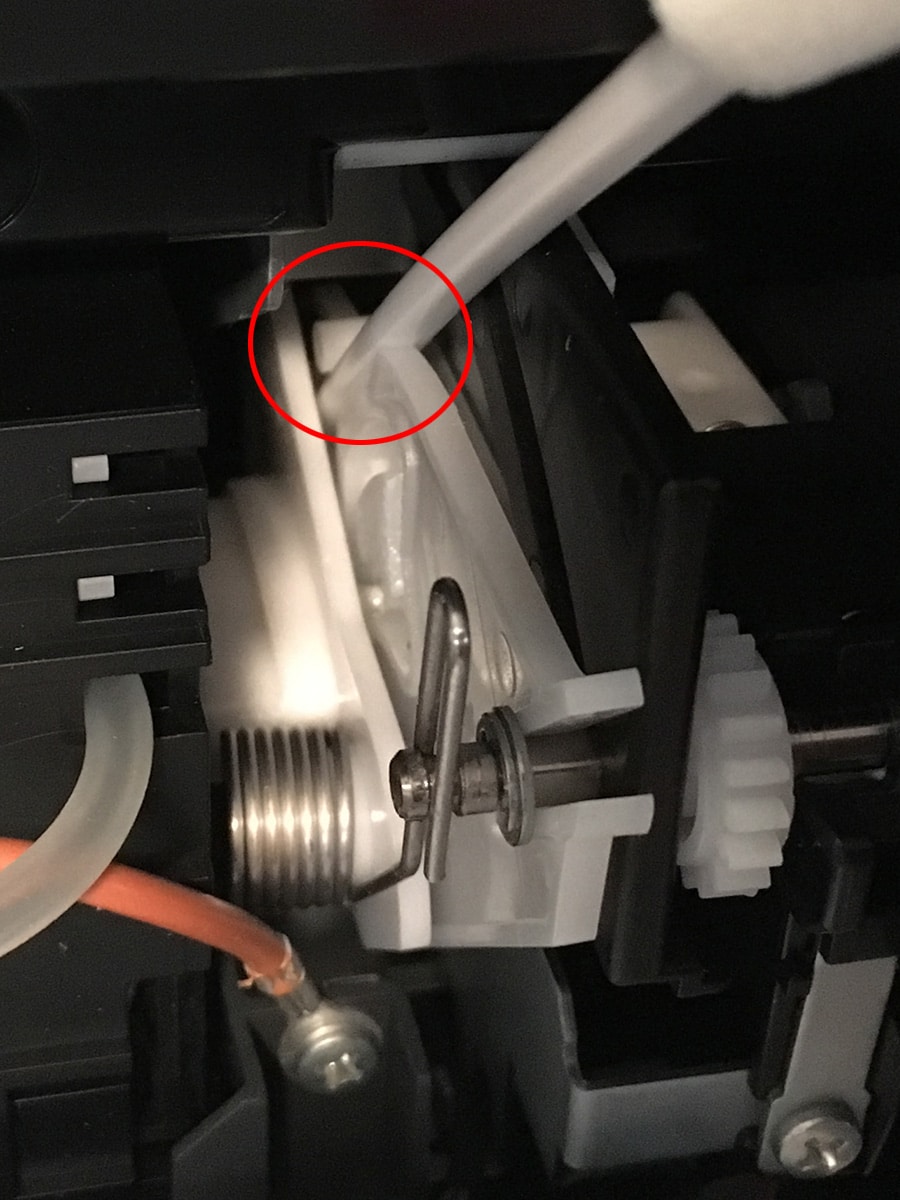
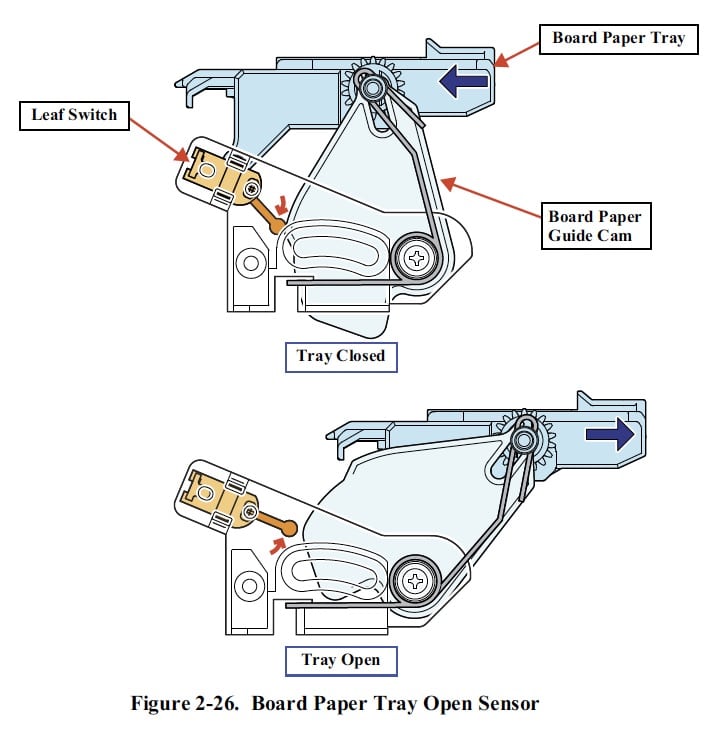
- The Leaf Switch is behind the large white plastic cam near the left side of the opening. When the tray is closed the cam lifts it. What we need to do here is to lift it and prop it in the lifted position. I used a letter opener slipped between the cam and the white plastic piece to its left to get behind it and under the switch and lift it, then I slipped the stick part of a long swab over the cam and under the switch to hold it in that position.
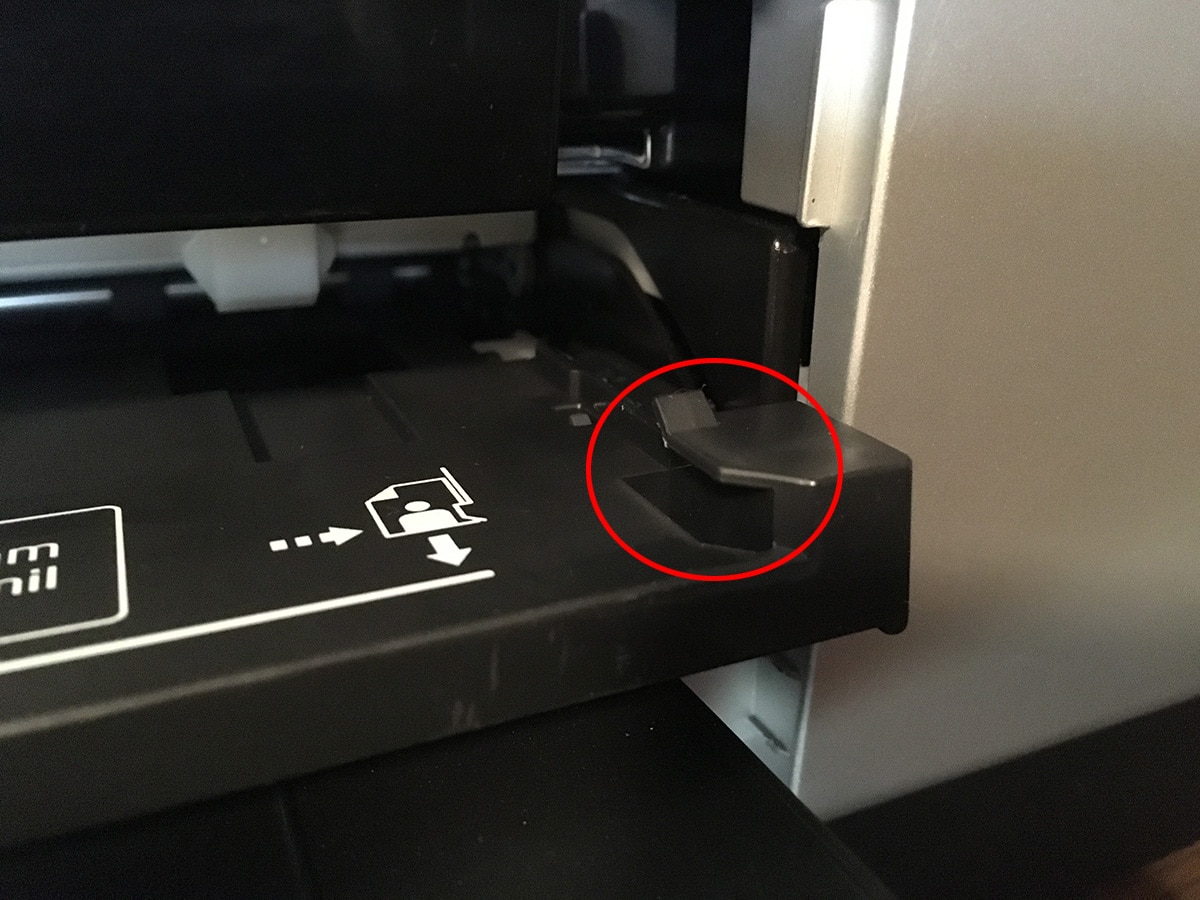
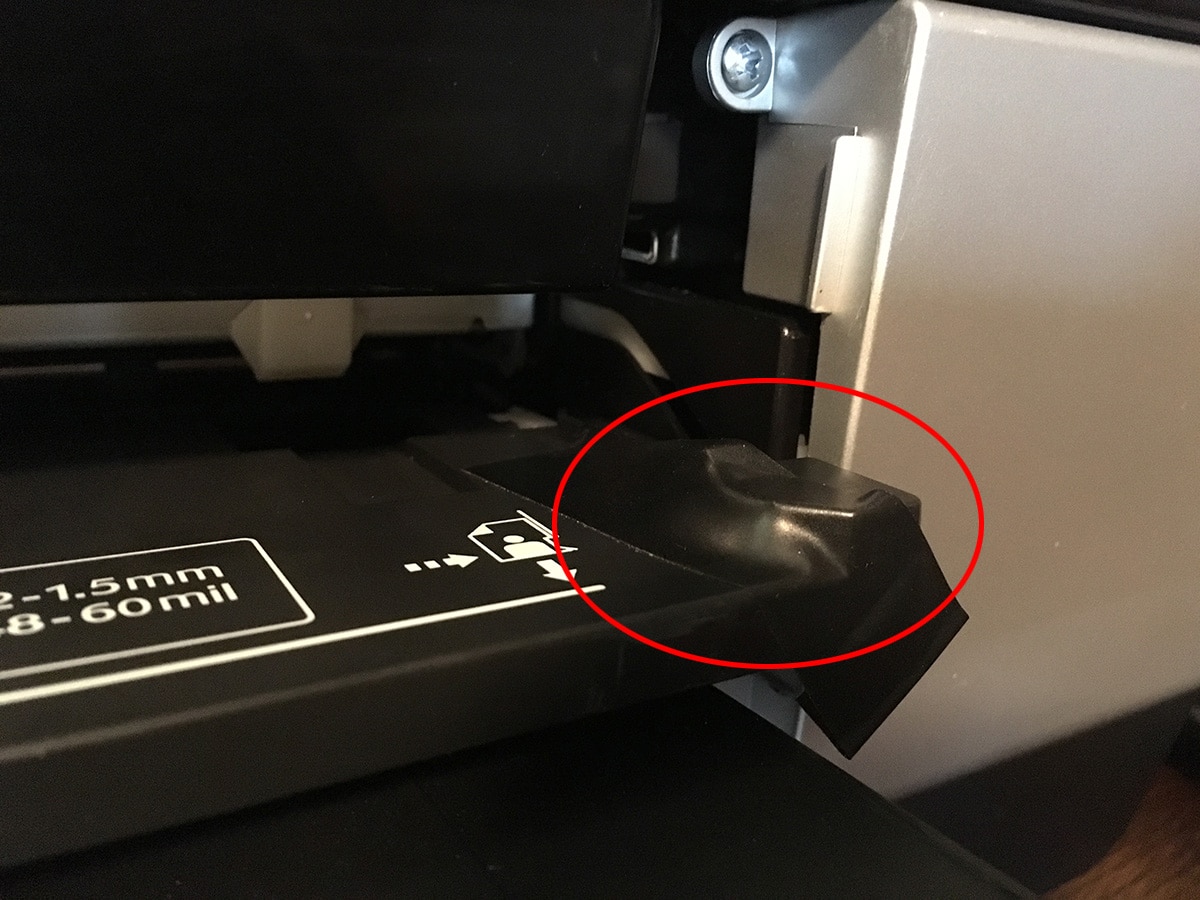
- Now locate the guide tab on the front right corner of the Front Feed Tray.
- Using a piece of electrical tape or similar flexible tape, cover the tab in such a way as to create a ramp that exiting film or paper can slide over.
- Finally, you may want to take a strip of film the width of the eject tray opening (17 inches) by 3-4 inches and place it so that the exiting film cannot accidentally slide below the Front Feed Tray which is left in the open position.
1 Like
Thanks Keith!
Thanks Keith. Mind if I put this in the manual and credit you?
My list of things in life is too long . .
-Walker
Sure, but let me polish it a bit first. 
The above outline is really a rough draft. I welcome any corrections, additions, comments. The pictures are not in order, but I can’t seem to edit it again.
When I have more time I think I’ll write it up all nice and pretty and post it on my website.
Looking at the diagram of the Leaf Switch, I found a much easier way of holding it in the closed position than what I described in step 5 above. Rather than lifting it, it can be depressed and held in that position with the business end of the swab or something similar. This is much easier to do and less likely to break anything.
I’ve been working on a blog post this afternoon, and will post the link soon.
Walker, let me know how best to deliver it to you for the manual.
Keith, Thanks again for the instructions.
Do you know if there is a minimum for the bottom margin of the sheet using this modification?
I’ve been going with a 1/2 inch on the leading edge and 1.5 on the trailing.
It’s really important to remember to fill with black. I forgot one day last week and it made a mess trying to print to the edge.
Do you have suggestions for avoiding star wheel marks on the Epson P800 ?
Thanks.
Pop the left front cover off, put a swabbit in the right place, pop the front-loader cover down (this raises the star wheels) and you’re good to go.
https://jkschreiber.wordpress.com/2016/08/08/how-to-disable-star-wheels-on-an-epson-3880/
The P800 requires no screw driver. Just pops off.
-Walker
Thanks. Actually, I just discovered that I can get my P800 to accept the Pictorico film by loading it as poster board via the manual front feeder. You need to feed it far enough into the front tray that it extends out the back of the printer about 5 inches before hitting “load” on the printer. And watch the negative that it doesn’t curl and get scratched as it exits the printer.
The problem with this is that the head is raised high (widest platen gap) and your neg will be a bit blurry.
So you need to trick the printer into printing in “poster board mode” with a lower platen gap (aka, the entire contents of this thread).
best,
Walker
This weekend I modified the 3880 to disable the star wheel assembly when printing ohp film. I pushed the lever up as in the supplied jpegs. For the first couple of sheets it kid of worked, no star wheel marks except on the trailing end of the film outside the image area. Now the last quarter inch of both negs and prints is printing darker and shows what looks like a pressure black line running horizontally across the image area .
My platen is set to standard and I’ve tried wide as well.
I just read where Burkholder mentions to set your dry time during head movement differently to slow down the printer and set the head distance to narrow. Does that do anything? This is driving me freaking nuts.
john
It sounds like your 3880 is in need to forward and back leaders. I cut 4" strips of letter paper and back-tape these flush to the film. Then in print tool I put 4" tall black tiff at the top and bottom so as not to over-ink.
If you don’t want to bother with this, then you simply need to set your paper size to be shorter by about 1.5" or so. Your front rollers are not longer active so your film is not going to move forward once it has gone past the back rollers . . . .
Printers are not designed to print film (specifically small formatters like this). But they do if a small amount of tinkering is applied.
best,
Walker
Thanks Walker,
I am buying the film in rolls. Can’t I just make the dimensions of the film longer and select and fill a black stripe at the very end of the sheet away from the image area? Would that work? Seems like a lot less problematic than taping paper leaders to the film.
I am going to want to print with both clear borders as well as black borders depending on whether brush strokes are wanted or not.
John