Im trying to make a limiting curve for Cyanotype on hahnemuehle platinum rag and Im finding that my limit number is like 160. Is this possible? it seems way low. My environment is close to what the documentation says the Cyanotype quad is based on.
Cyanotype is incredibly unstable so 160 is not out of the ordinary but if you did not use fresh hydrogen or other chem, this could be the issue, and not the neg itself.
The most important thing to do when dealing w/ making a perfect cyanotype neg is to make sure you use fresh Hydrogen peroxide each time you print a target or you will start seeing the highlights disappear.
Also, I suggest that after you are done linearizing, you make a low contrast version of the linearized cyanotype curve that will enable you to dial in shadow or highlight detail on a case-by-case basis using just the QuadtoneRIP curve sliders. This will allow a more detailed control of the contrast based on your intuition of the day’s darkroom requirements.
best,
Walker
The exposure scale of traditional cyanotype is much shorter (almost 3 full stops) than that of platinum-palladium, kallitype, etc, so it’s going to be a fairly large drop from step 1 to step 2. I agree with Walker that this is not unexpected.
Thank you for your response!
I have also found a limiting number of 160 for cyanotype on Stonehenge paper with a base exposure time of 18 minutes.
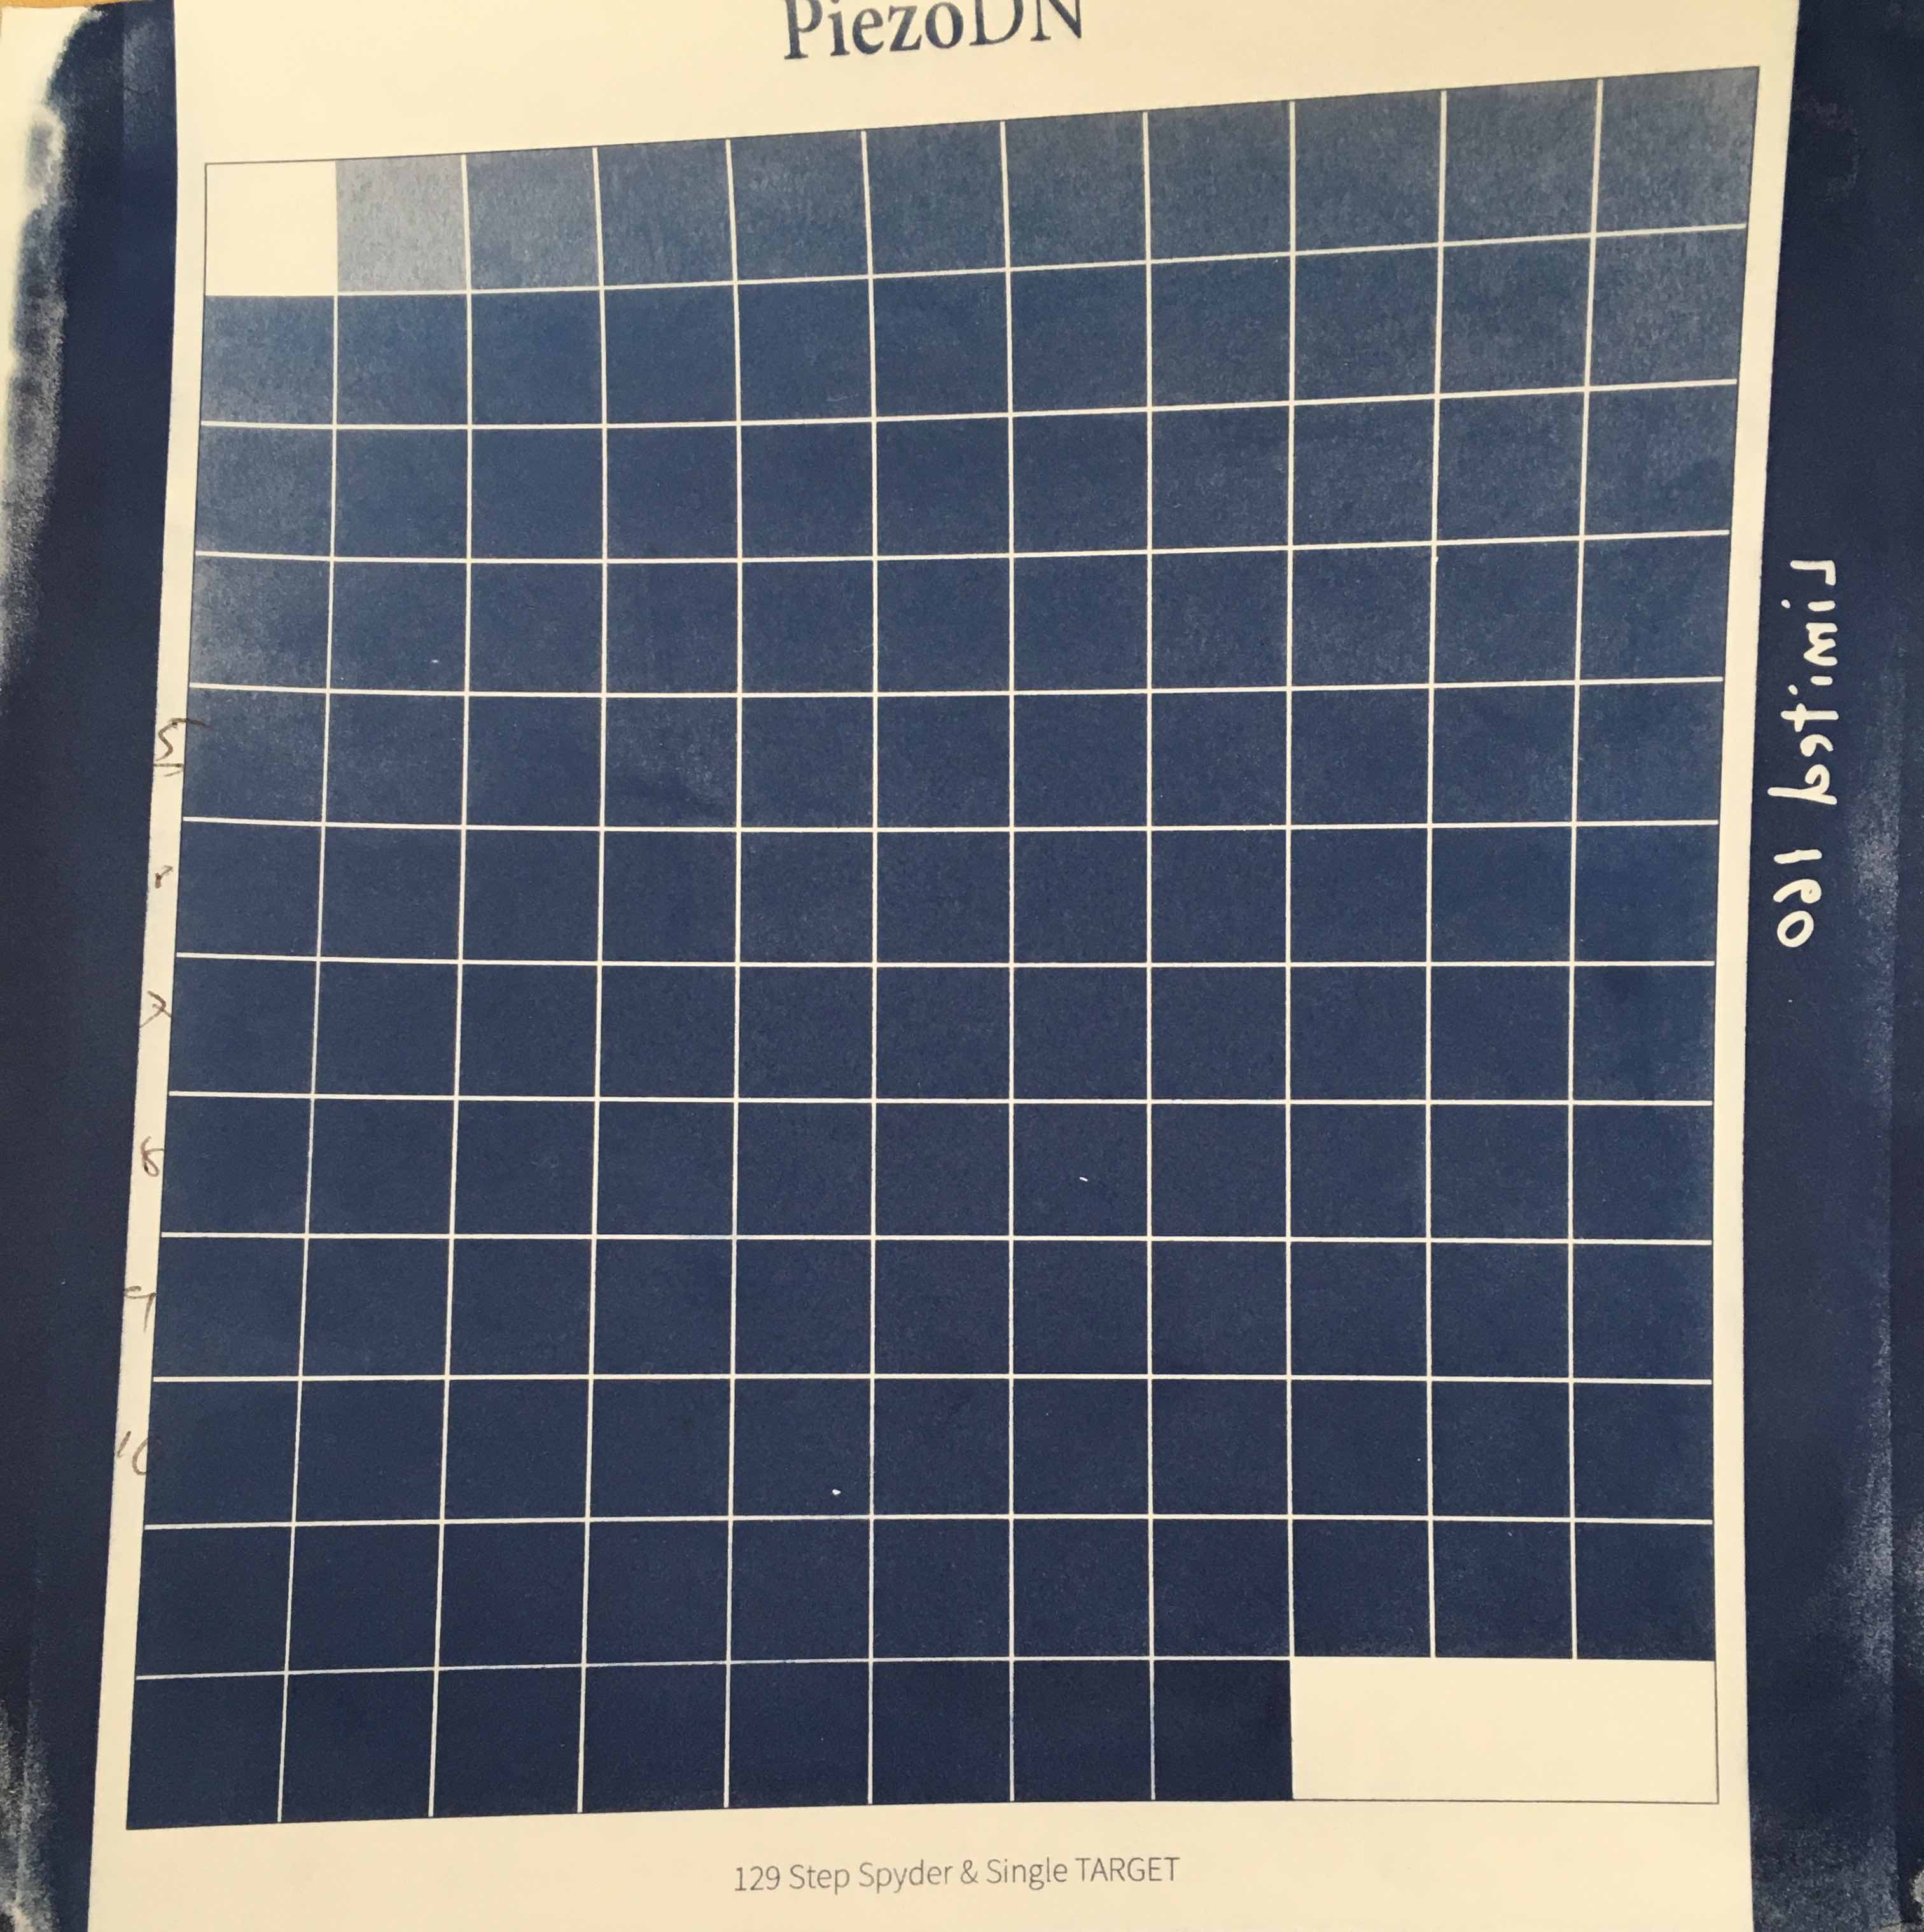
When I make a new 129 step target printed with the limited quad, the result shows highlights almost completely lost, except in the first two steps.
Can I go ahead and try to linearize? Or is something wrong with my procedure?
What you need to do is now actually LIMIT the curve you used to print the original 256 step limiting target with. Look at the limiting procedure in the PiezoDN chapter (chapter 9) in the Deluxe Manual pdf. After you have successfully limited the .quad then you print your 129 step target with this .quad and linearize.
best,
Walker
Thanks, Walker,
I believe I have confused the 256 and 129 step targets! I’ll try again.
Regards,
Peter
I am continuing to have difficulty getting going with cyanotypes with PiezoDN on an Epson 1430. I have repeated these steps several times:
-
Exposing a Stouffer 21 step wedge for 32 min gives me a base exposure time of 11 min, I believe. (All the subsequent steps are similar if I use 16 min.)
-
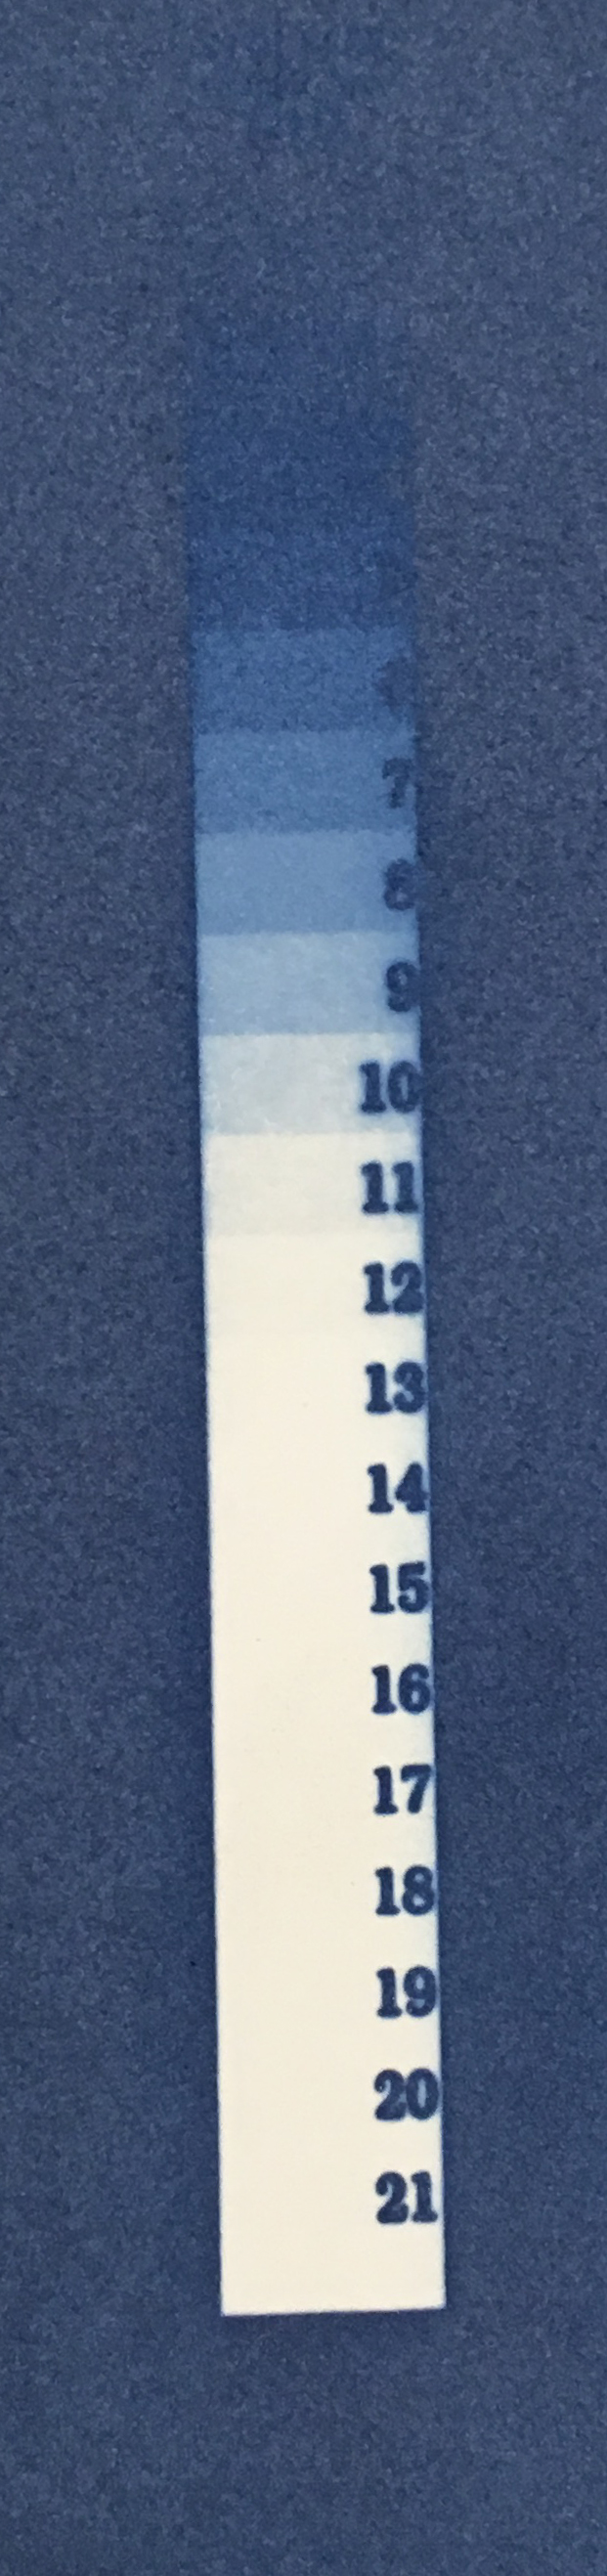
Exposing the limiter target gives me a limit number of about 160. I’m using Stonehenge paper.
-
I make a limited master curve and expose the 129 step target, but it looks extremely dark (and the transparency is correspondingly thin). No reasonable linearization then results.
Does anyone have an idea how to troubleshoot this?
Peter


Just looking at your limiter target print, I think you need to change your darkroom chemistry or method.
There are problems and this is causing instability in the contrast of the cyanotype which is making you unable to consistently print tones. I suggest using Madle Ware’s new formula if you aren’t already. If you are, than there is something missing in the workflow on the analogue side.
-Walker
Thanks, we have been using a completely standard cyanotype workflow that has worked well in the past. Standard two-part formula with rinsing in water with a splash of peroxide. This has made nice cyanotypes in the past with negative made by other methods including collodion negatives and digital negatives.
I will try to trouble shoot this workflow, but I am still concerned that I am making mistakes with the procedure for making and applying the limiting curve.
If I try the Ware new cyanotype, can I expect a higher limit number that the 160 I’ve been getting?
Ware is higher latitude, yes.
Just by my brief experience: the first limit target looks like the peroxide was not fresh, and the second looks like there peroxide was fresh.
When I calibrate negs for cyano I make sure that the peroxide is exactly the same amount and make sure that I put the print into the bath the exact same amount of seconds after the peroxide.
Make sure that your print the two targets on the same day with same everything except for the different curves you are making.
best,
Walker
Thanks, good advice! I will be more systematic with the amount of peroxide. And reprint the targets on the same day.
Okay, so not printing the limiting target and the 129 step target at the same time was the problem.
I just reprinted the limiter target and it came out MUCH weaker than the one I printed several weeks ago.
Ink levels are good and I do regular head cleaning and nozzle checks, but clearly the prints are all a lot weaker than when I first set up the 1430.
What other steps should I take to troubleshoot why the negative prints are so weak? Or should I assume that the prints I did just after setting up the printer were unusually strong?
I’m not sure why it would be this way. Did you agitate inks before doing the neg the second time? How long has the printer been sitting? And you are sure you used the correct curve each time?
More importantly, is the the max (paper white) density on the film still the same? If so, than it’s a curve selection/revision issue. There are many variables at play but those could be some of them.
-Walker
The max density is not the same, it’s much weaker now than the first time I printed. I’m pretty sure I have always printed the limiter with the Master provided for the 1430.
I’ve revised curves a lot, but am careful to delete curves carefully following the online instructions.
After refiling inks and several head cleanings the nozzle check looks as in the attached image. The limiter target with the Master curve is still printing with much less Dmax than the version I did a month ago. Any advice what to do?
This is with an Epson 1430 with the selenium ink set.[attachment file=29722]
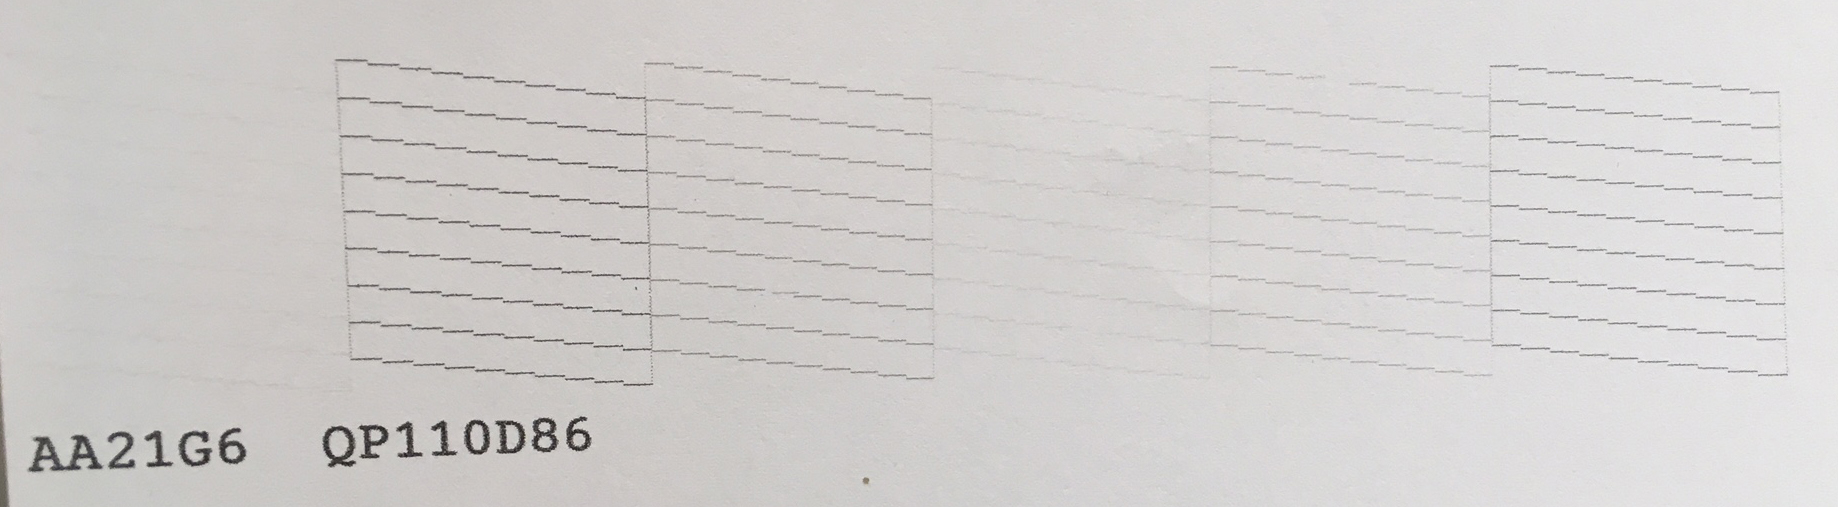
After several head cleanings, the maximum density on the film when printing the limiter is still very weak, and the nozzle check looks as in the attached file. The first and fourth inks are faint. This is with the selenium ink set on the Epson 1430.
Any advice how to fix this?
Hi Peter,
The relative densities in the nozzle check look normal. The faint channels are your light inks. Going left to right they are shades 1, 6, 3, 5, 4, and 2. Shade 6 is always nearly impossible to read. I see one missing nozzle in the top line of shade 4. (I’ve had one in my 1430 too for the last several weeks that won’t go away, but there’s no sign of it in actual negs, so I’m ignoring it for now.) It looks like you printed the nozzle check on plain paper which accounts for the slight roughness. It will look much clearer printed on coated paper.
As for poor black density, I think the next thing to do is print the 6-channel flush image using QTR Calibration mode. Let us know if you don’t know how to do that.
Thanks, Keith,
I do not know how to print the 6-channel flush image. Could you please give a hint how to get started? Thanks
Here’s the download link: QTR Cal Mode Flush Images.zip
- Open the 6-channel flush image in PrintTool (Mac) or QTRGui (PC).
- Scale to desired size. (Give it at least an inch margin.)
- Be sure the correct printer is selected and that No Color Management is selected.
- Click Run Print ...
- In the QuadTone RIP drop-down menu, select Mode: QuadToneRIP Calibration, and set the Calibration Ink Limit at 80 for coated inkjet paper, or 30 for plain paper. I suggest using a coated inkjet paper (glossy is most like film) for this since you are doing this as a diagnostic, rather than simply pushing ink through. For that reason, I suggest using the same Resolution and Speed settings you use to made negatives: 2880 super, and uni-directional. Do not use any of the Advanced Adjustments.
- Print.
Then show us the results.