Maybe I’m just not familiar with the term but I find it rather vague in the read me file about the exposure time used for the palladium prints with a 4880 it just says 180 “units.” A little more specifics would be great. Also what kind of UV source.
Units refers to one type of printer typically those industrial screen printing units with vacuum tables with the overhead HID lamp (mercury vapour). You set the “time” in units because (I think) it has a feedback loop that measures the light output over time as it alter as the lamp warms up. Personally I use a LED light source and other use BL or BLB tubes.
Shane
Like Shane said, “units” refers to the light measured by a device called an integrator that is usually found on industrial mercury vapor and metal halide plateburners such as those made by companies like NuArc, Olec, Theimer, and Amergraph, to list just a few. It is an arbitrary, customizable measurement that adjusts itself to fluctuations in output of the lamp as it warms up, voltage fluctuations, etc. Theoretically it is more consistent than simply timing the exposure.
It is possible to use a stand-alone integrator with a sensor with any UV light source. I’ve got a couple but I’m not currently using them.
Thanks! I made my first palladium print last night(at least first one in a long time). I have a very basic light source that I made using black light CFLs. I think I need to dial it in a little more to get a consistent exposure time figured out, any suggestions on finding the perfect exposure time?
Thanks,
John
If you have an analog film step tablet, like the Stouffer TP 4x5 21-step, find the time at which steps 1 and 2 merge, that is you can’t see a difference between them but you can see a difference between 2 and 3. You can do this visually, but use a densitometer or spectrophotometer if you have one. Then to reduce that time by 1/3 stop, multiply it by .79 (2 to the -1/3 power). Sorry, I don’t know how to type that properly in a browser! I use 1/3 rather than 1/2 because we also need to compensate for the difference between film base density of the Stouffer which is about 0.05 vs the Pictorico Ultra which is about 0.15, or 1/10 of a stop.
If you don’t have one of those you can do it with a digital 21-step, though this may be less accurate because you have not yet linearized it. Here, film base and step 1 are the same so you will be looking the exposure time where you see no difference between an uncovered part of you coated paper and the adjacent film base, but still see separation between steps 1 and 2. You won’t need to reduce this time, but you may need to tweak it once you have a linearized curve to work with since the “space” between steps will have changed.
Hope this helps.
I forgot to mention that if you use different papers they may require different exposure times.
Thanks for so much help Keith!
My print is way to bright in the highlights, when I tested for a black I got an exposure time of about 10 min (obviously I’ll need to make a more precise time, using your suggestion.) I’m thinking of buying a 400 W Hid light, do you think this would be enough for exposure?
I’m using Arches Platine, the light weight one. I’ll either buy, or rent a color munki so I can get a dialed in system! Do you make negatives intended for storage and let them dry 48 hours or just print them right from the printer? I was kind of hoping that they would have a few more pre-made curves but I guess that’s coming.
Thanks again for the help!
John
I’ll be out of town until late tomorrow afternoon. I’ll respond in detail probably tomorrow evening.
Hi John,
In order to address your question with specific answers, I need more specific information from you about both your negatives and your printing methodology. One thing that most of us working with hand-coated processes learn is that no matter how tightly we may think we are controlling things, there are so many variables that it is very easy to overlook something.
Negatives: I know you are using a 4880. I need to know your PrintTool and QTR setups, especially the Print Color Management section in PT, and the curve you are using in QTR.
Printing: You mentioned you are printing in Palladium on Arches Platine Light. What is the exact mix you are coating with? How are you coating? What developer and developer temperature? What are you using for clearing the print? What is the temperature and humidity in your working environment? Is it reasonably consistent? How even is the illumination from your light source? Etc.
In my opinion, which may differ from that of Walker and Jon, the likelihood that any user will be able to work with the IJM profiles without having to modify them is fairly small. In theory, maybe that shouldn’t be the case, but in reality there are so many variables that can interact in so many more different ways that the chance that any 2 of us are doing things in the exact same way and under the exact same conditions is slight. The ability to customize the PiezoDN system to your working methods and environment is one of its biggest strengths. The point of this is that more pre-made curves is not really what you need. Calibrating the system to your personal methods and environment will get you much better results much quicker than mucking around with pre-made curves.
Speaking of pre-made curves, there are 2 separate things that you need to be aware of, one of which must be used, the other is optional.
- The QTR curve. These are the .quad files that are installed via the Installxxxx.command in the Curves folder for your printer. One of them MUST be selected as Curve 1 in the QuadToneRIP section of the Print dialog. In your case, my guess is that you are using x800-x880-PiezoDN-Pd-Ox-IJM. This is IJM's linearized profile for Pd developed in Potassium Oxalate. It is not paper specific, and unless you make your own custom linearized profile you should be using it with whatever paper you might be using. This curve can be used by itself if you have selected No Color Management in Print Tool, or in conjunction with ...
- The ICC profile. Use of an ICC profile is optional. As described in the manual, it has the effect of deepening the shadows (at the loss of some detail due to compression towards black) and increasing contrast through the rest of the scale from white down to around 80%. Some people like this look, others don't. I'm in the latter group. ICCs can also be customized manually, but that is getting into advanced territory that I'm just starting to play with.
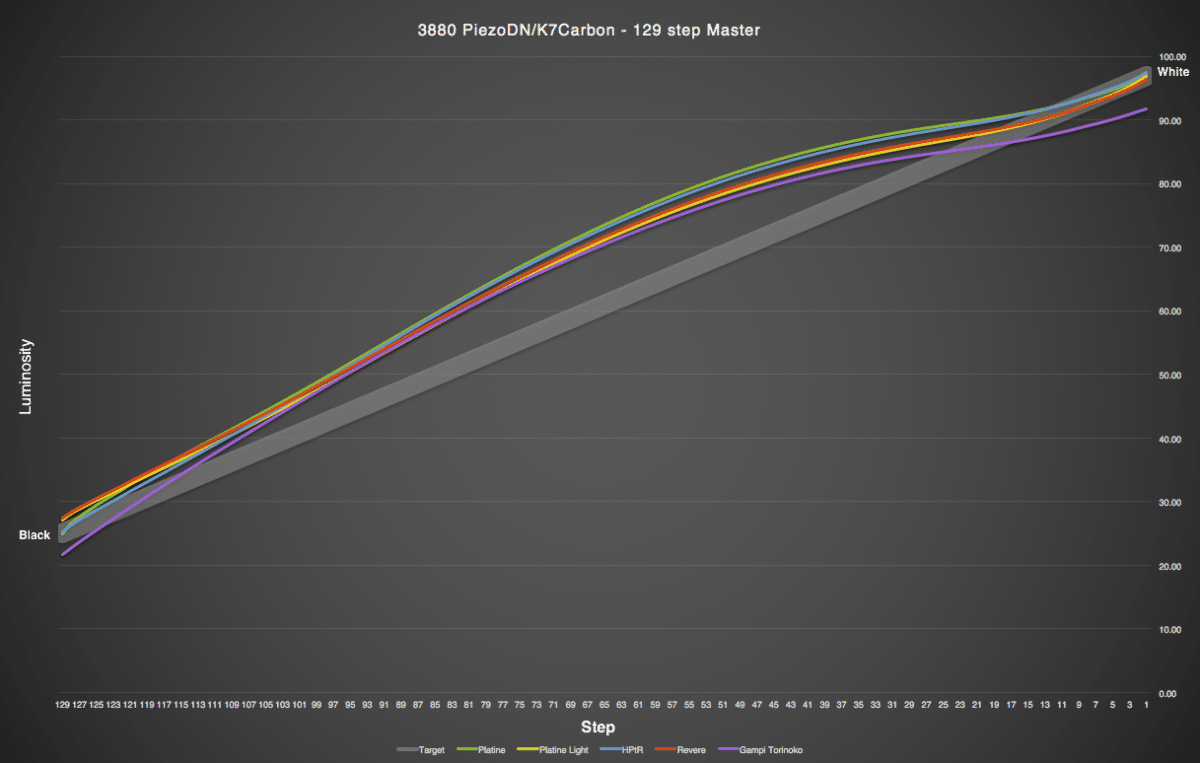
With the custom curves that I have made, I take a slightly different approach. Starting from the Master curve, I make a custom linearized curve for each paper I am using. Most of the standard papers (Hahnemuhle Pt Rag, Revere, COT320, and both versions of Platine) are fairly similar. The attached graph shows plots of each of those (except for COT) along with one for a Japanese paper I’m using called Gampi Torinoko. From the shapes of the curves, you can see that the linearizations for the standard papers are going to be very similar. This is why it works to use one linearized QTR curve for all of them and an ICC to adjust for the differences. The Gampi is different enough to need it’s own curve.
As you can see in the graph, the curves for Revere (red) and Platine Light (yellow) are nearly identical, so I would recommend that you use the Revere ICC profile with your Platine Light until you are able to customize things. From your description of your print being much too bright in the highlights, I think I can safely say you are going to have to make a custom linearized .quad in order to tame it.
Keith is right in this regard. V2 of PiezoDN will have only default Silver, Carbon, Platinum/Palladium, Cyanotype, and Salt curves. These curves will be generalized to match contrast with the monitor but will rely on a user-linearized curve to work perfectly.
best,
Walker