Hi All,
I’m new to PiezoDN and digital negatives, having recently crossed over from purely analog platinum printing on ultra large format film. This is my first post! I’m hoping someone can help me!
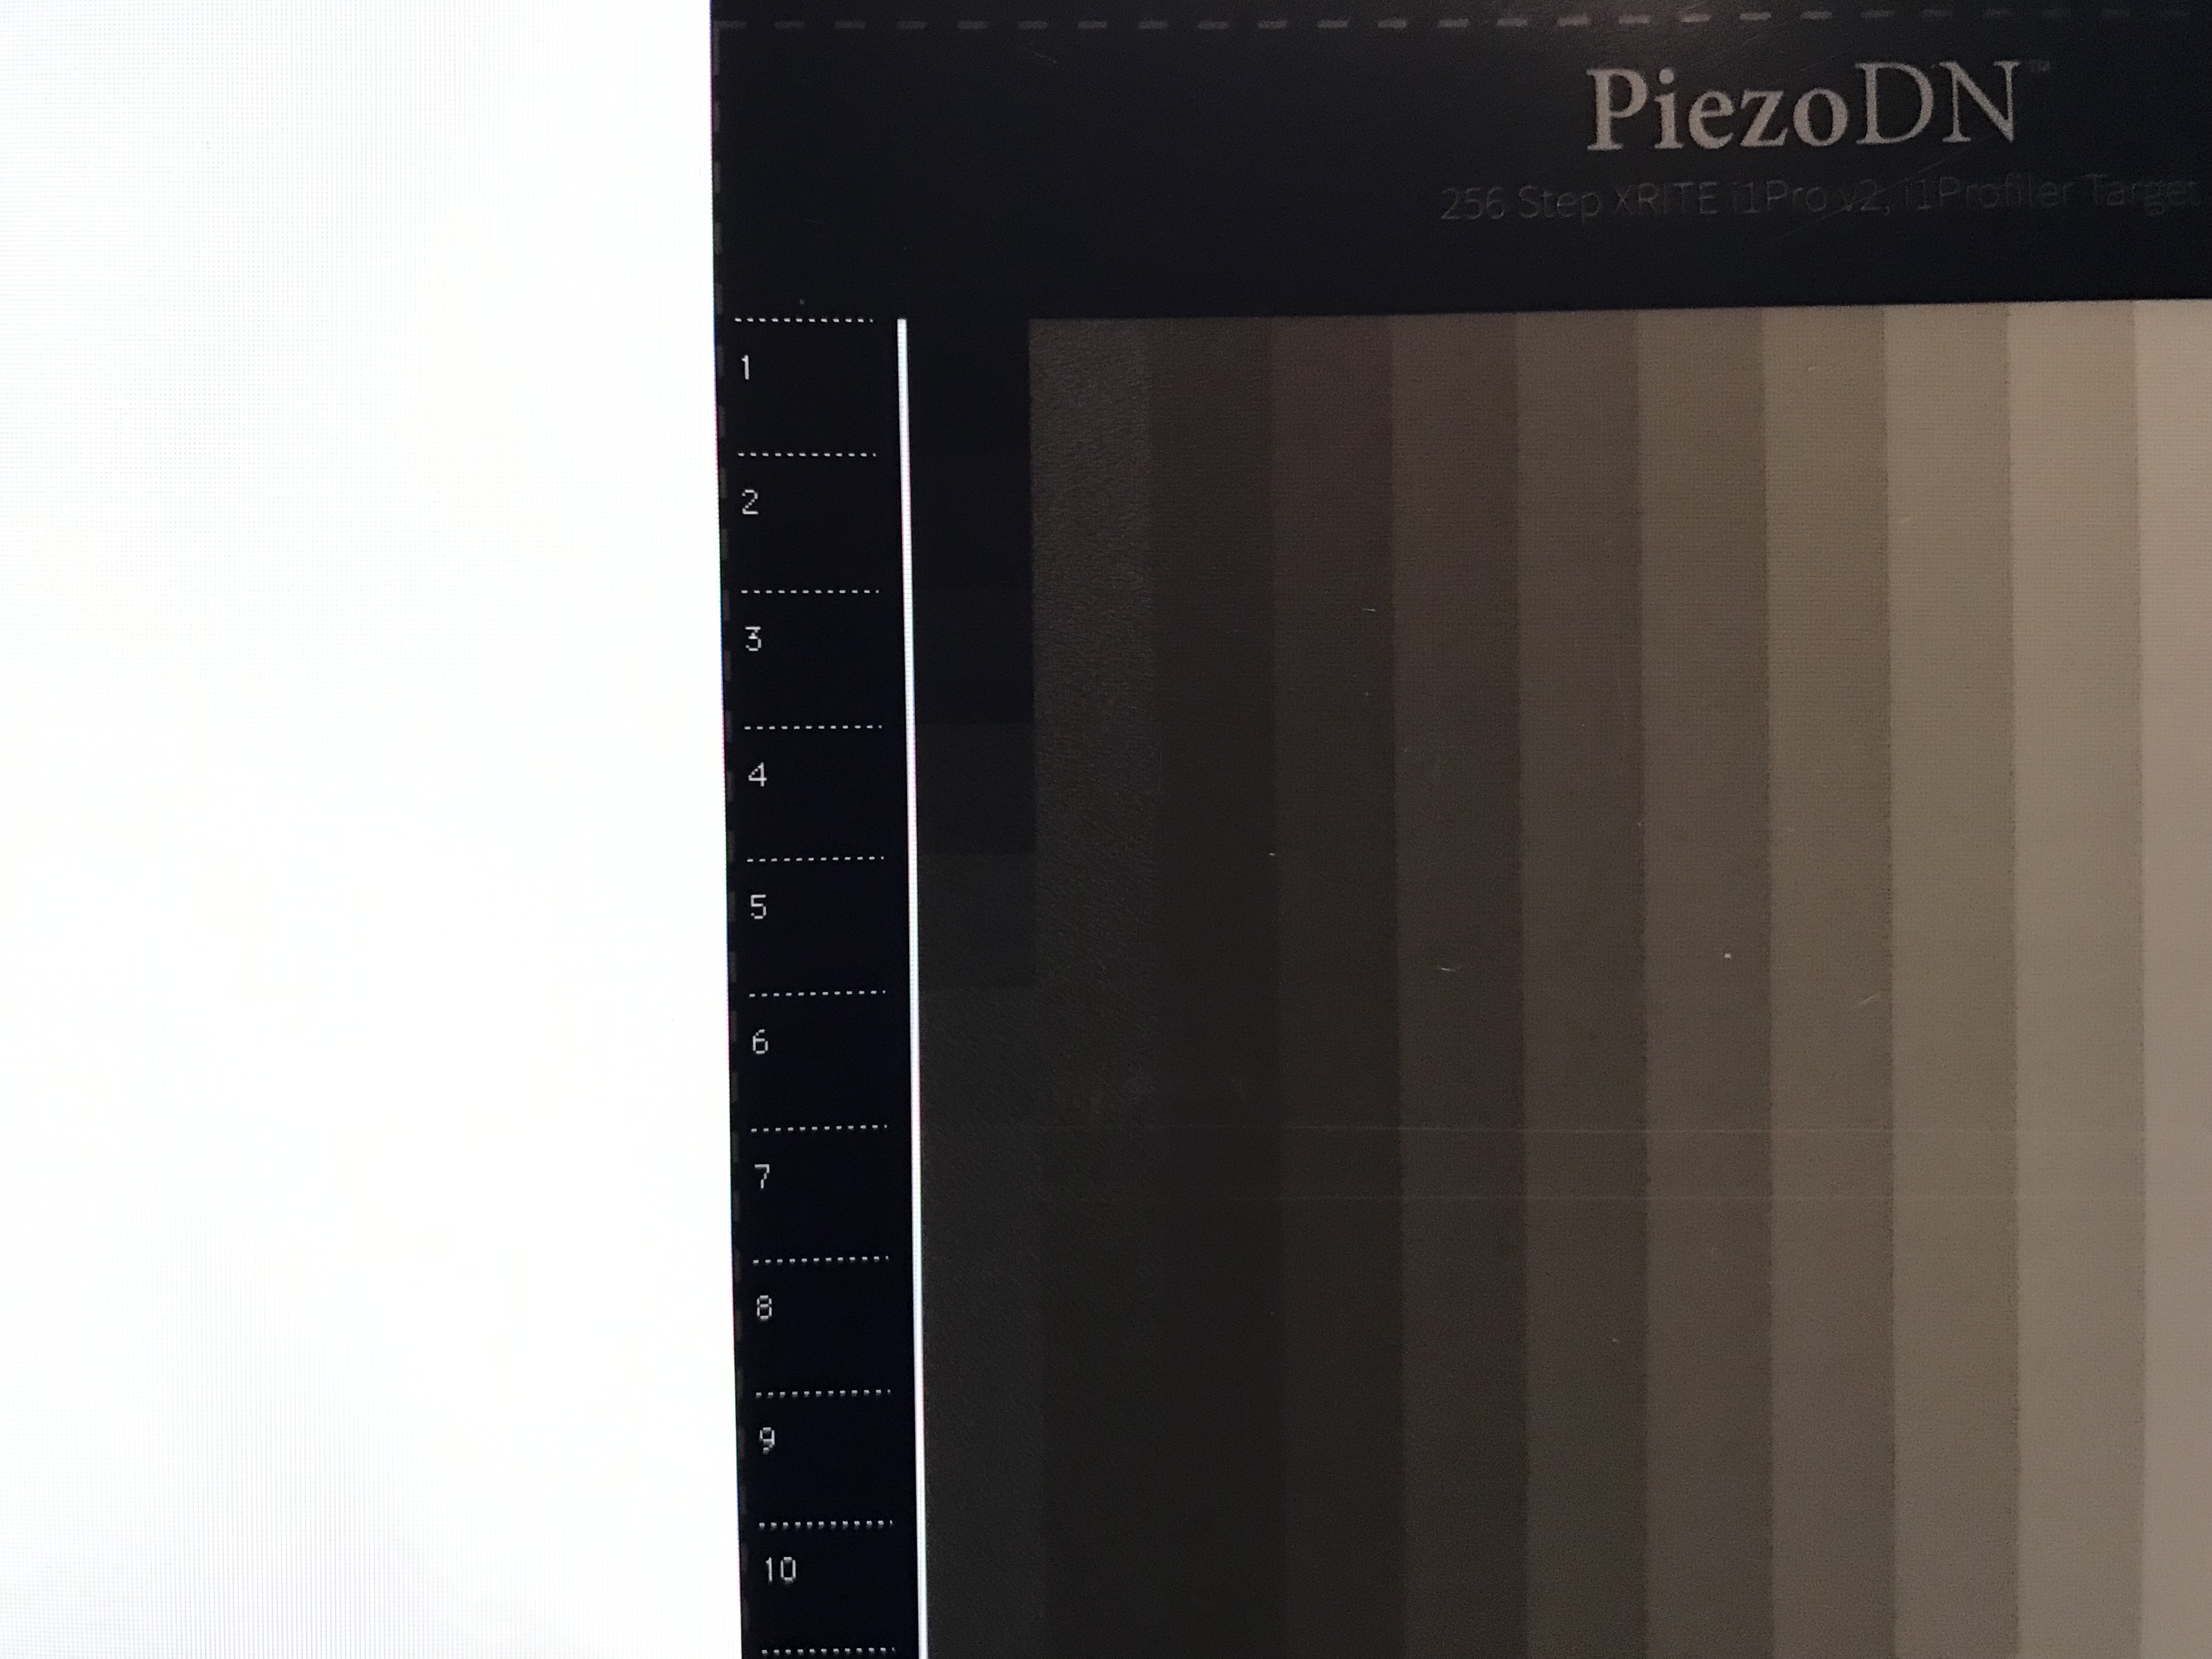
My problem: I’m printing the 256-step target for the i1 Pro-2, and I’m getting low density ink where I’d expect higher density. See the following image:
Perhaps you can see that the 2nd last column, where you would expect to see increasing density, it actually gets lighter?! I’ve double checked my cart loading, but could this be an ink switch? Or another issue? I want to keep opening the inks to a minimum to limit the number of resets, so I need a direction to try. I printed out a negative, and it shows some “solarization” in what should be denser areas of the negative. Which ink could I have mixed up?
I’ve done a calibration test and Walker suggests it looks fine, and nozzle checks come out as expected, so I’m wondering if anyone has seen this issue and can possibly help in any way! I am seriously stuck, as this is preventing me from moving forward… I can’t even do my initial setup of the system and my new, expensive inkset is just sitting unused while this remains unsolved.
I’m running a mac system with Print Tool and the latest version of software. P2 carbon inks on an Epson p800.
Thanks in advance for any assistance!
-Jesse-
1 Like
You don’t mention which version of Mac OS you are using, so if it’s Catalina then all bets are off. 
I’m running High Sierra on a Mac Pro. I use a 1430 with K6, a 3880 with P2-K6, and recently a 3880 with a still experimental K8-Dye inkset. I’ve seen something like this happen on all 3 printers going back as far as 3+ years ago but actually much worse so your situation may be different. But for what it may be worth, the solution in all cases was to shut down and restart the computer. Here is one particularly weird example:
This suggests a system error in my case. Yours is much more subtle though, so it may be something else, but that is where I would start. If you haven’t done so already, reboot your system.
Do a nozzle check to be sure all nozzles are firing and examine it closely to be sure they are firing properly. Note any deviations from perfect. Clean and repeat if necessary.
The next step would be to make absolutely certain that you didn’t make a mistake in the ink installation. One way to verify that would be to print the target on paper with the appropriate profile as if you were making a print to verify the profile. If there is an ink problem it would show up there too.
If all is good so far, print another target neg and let us know if the problem persists.
If none of this helps, then we’ll have to think of something else, but this is a good place to start.
Keith
Hi Keith!
Thank you very much for your comprehensive reply! My Mac is still running Sierra version 10.12.6. i’m running quadtone RIP version 2.7 and print tool version 2.1.1. Carbon P2 inkset on the Epson P800.
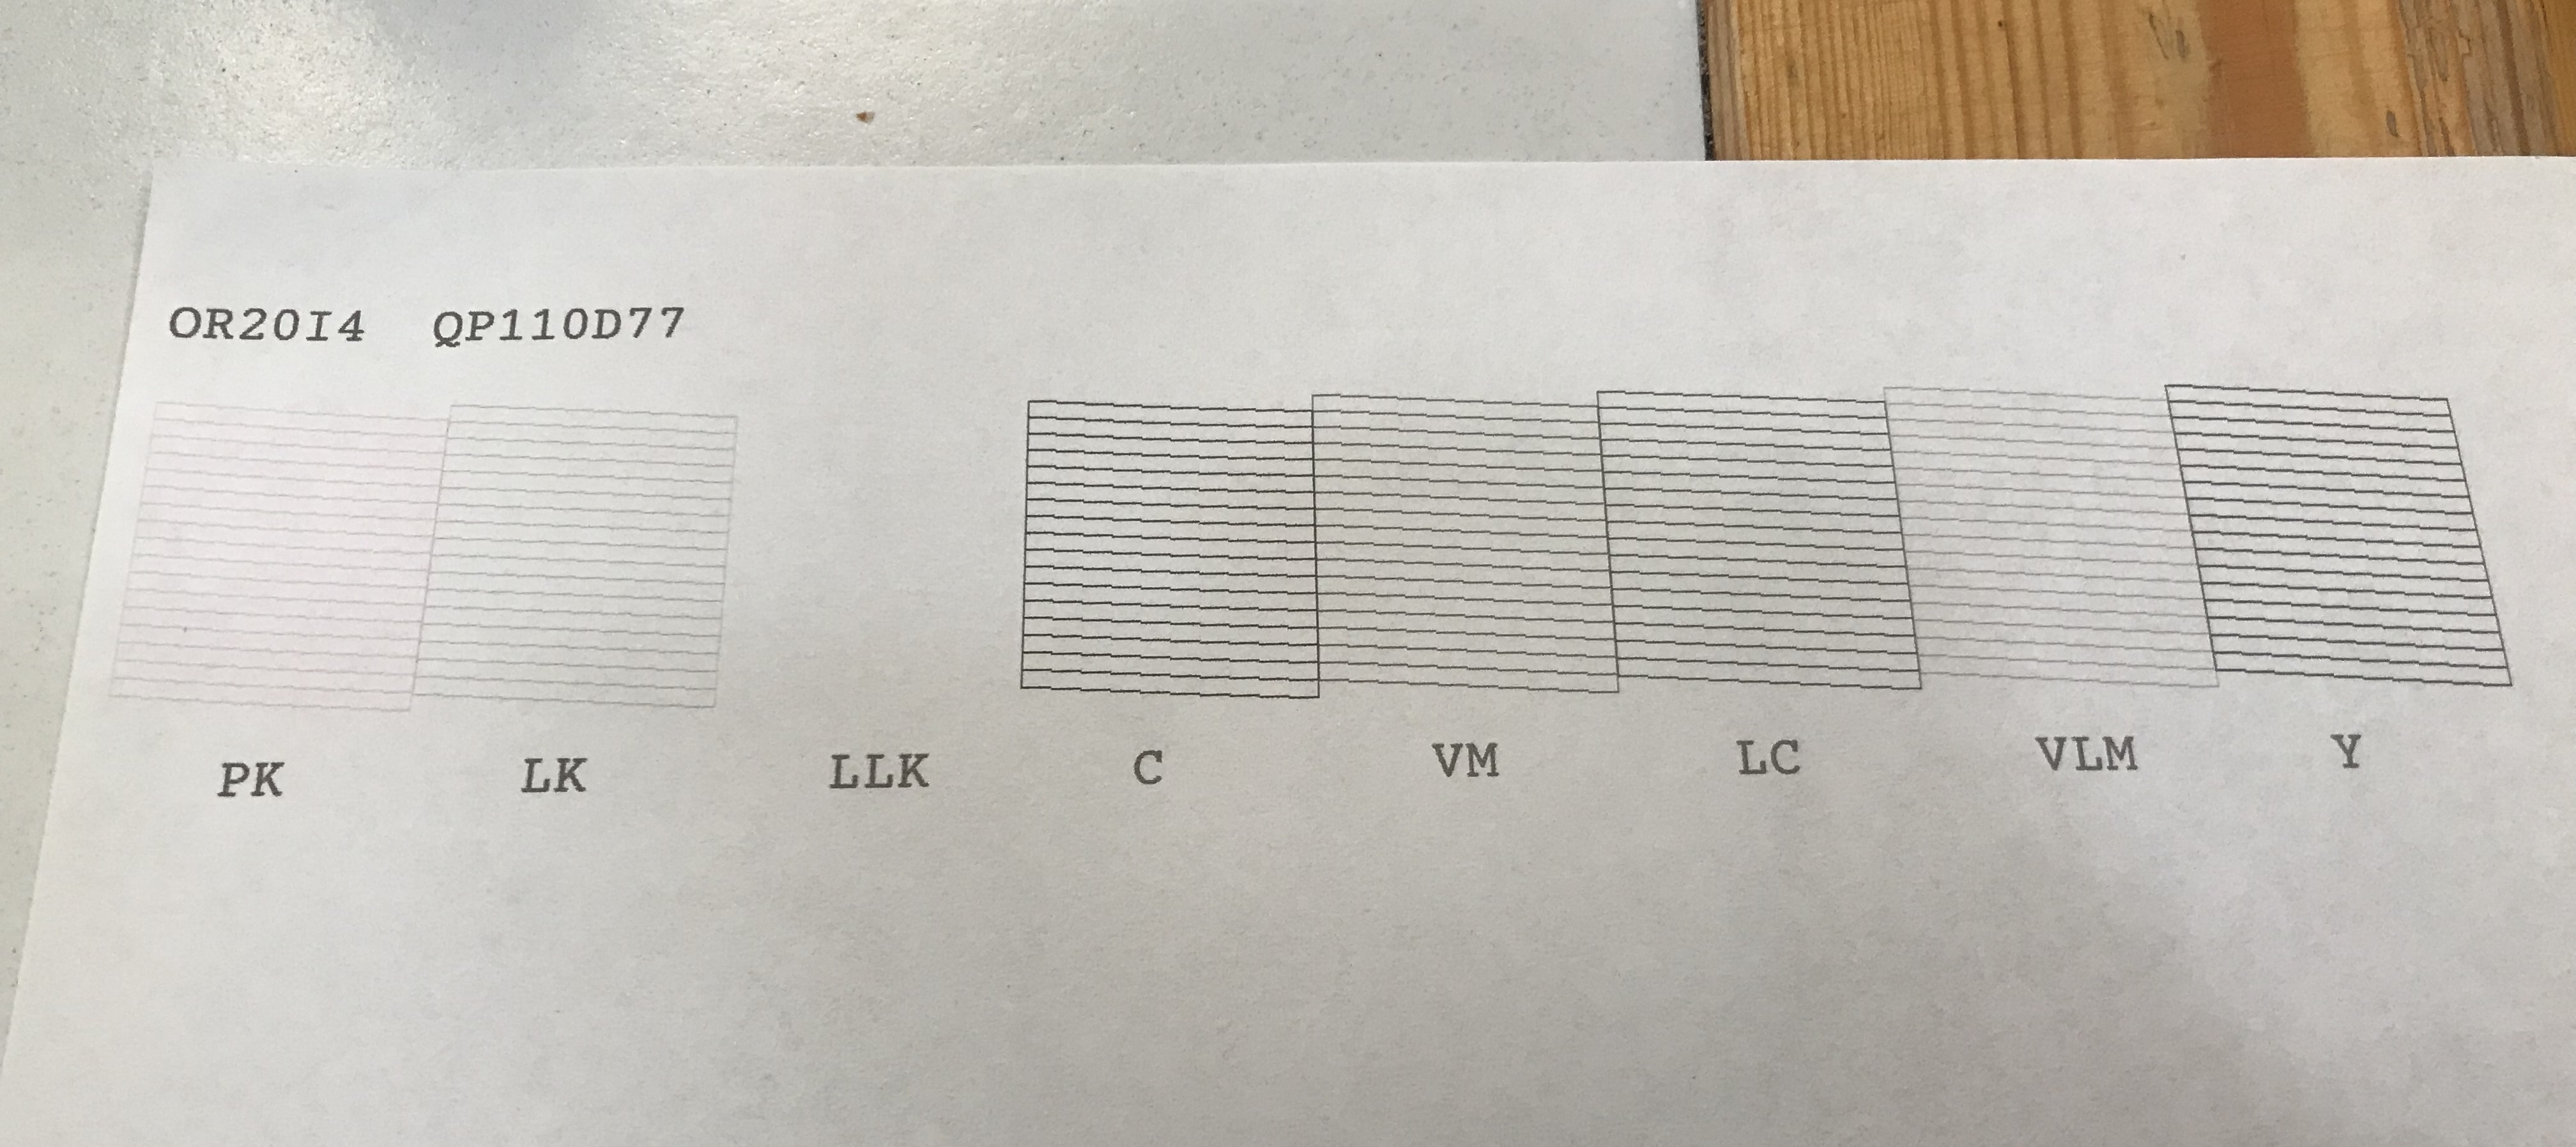
I restarted my machine to no avail. i did a nozzle check, and to me it looks good… perhaps you can comment:
And I did the calibration target:
At this stage, my only theory is a mistake in the ink installation. so your suggestion is to print the target as a positive on paper? I’ll try that… if you can clarify, I’d be extremely grateful. I only have PiezoDN installed, do I need to install Piezography community edition with it’s curves?
Thank you for bearing with my novice questions!
-Jesse-
1 Like
I just installed Piezography to print out a positive target on Hahn FineArt Baryta using the p800HDP2 profile, and I got a good looking target, without the issue I see in the piezoDN:
So I’m extra stumped now.
-Jesse-
1 Like
Nozzle Check: Looks good, though with a P2 setup you can leave it permanently in MK mode so that both K inks are always available. No need to switch Ks ever.
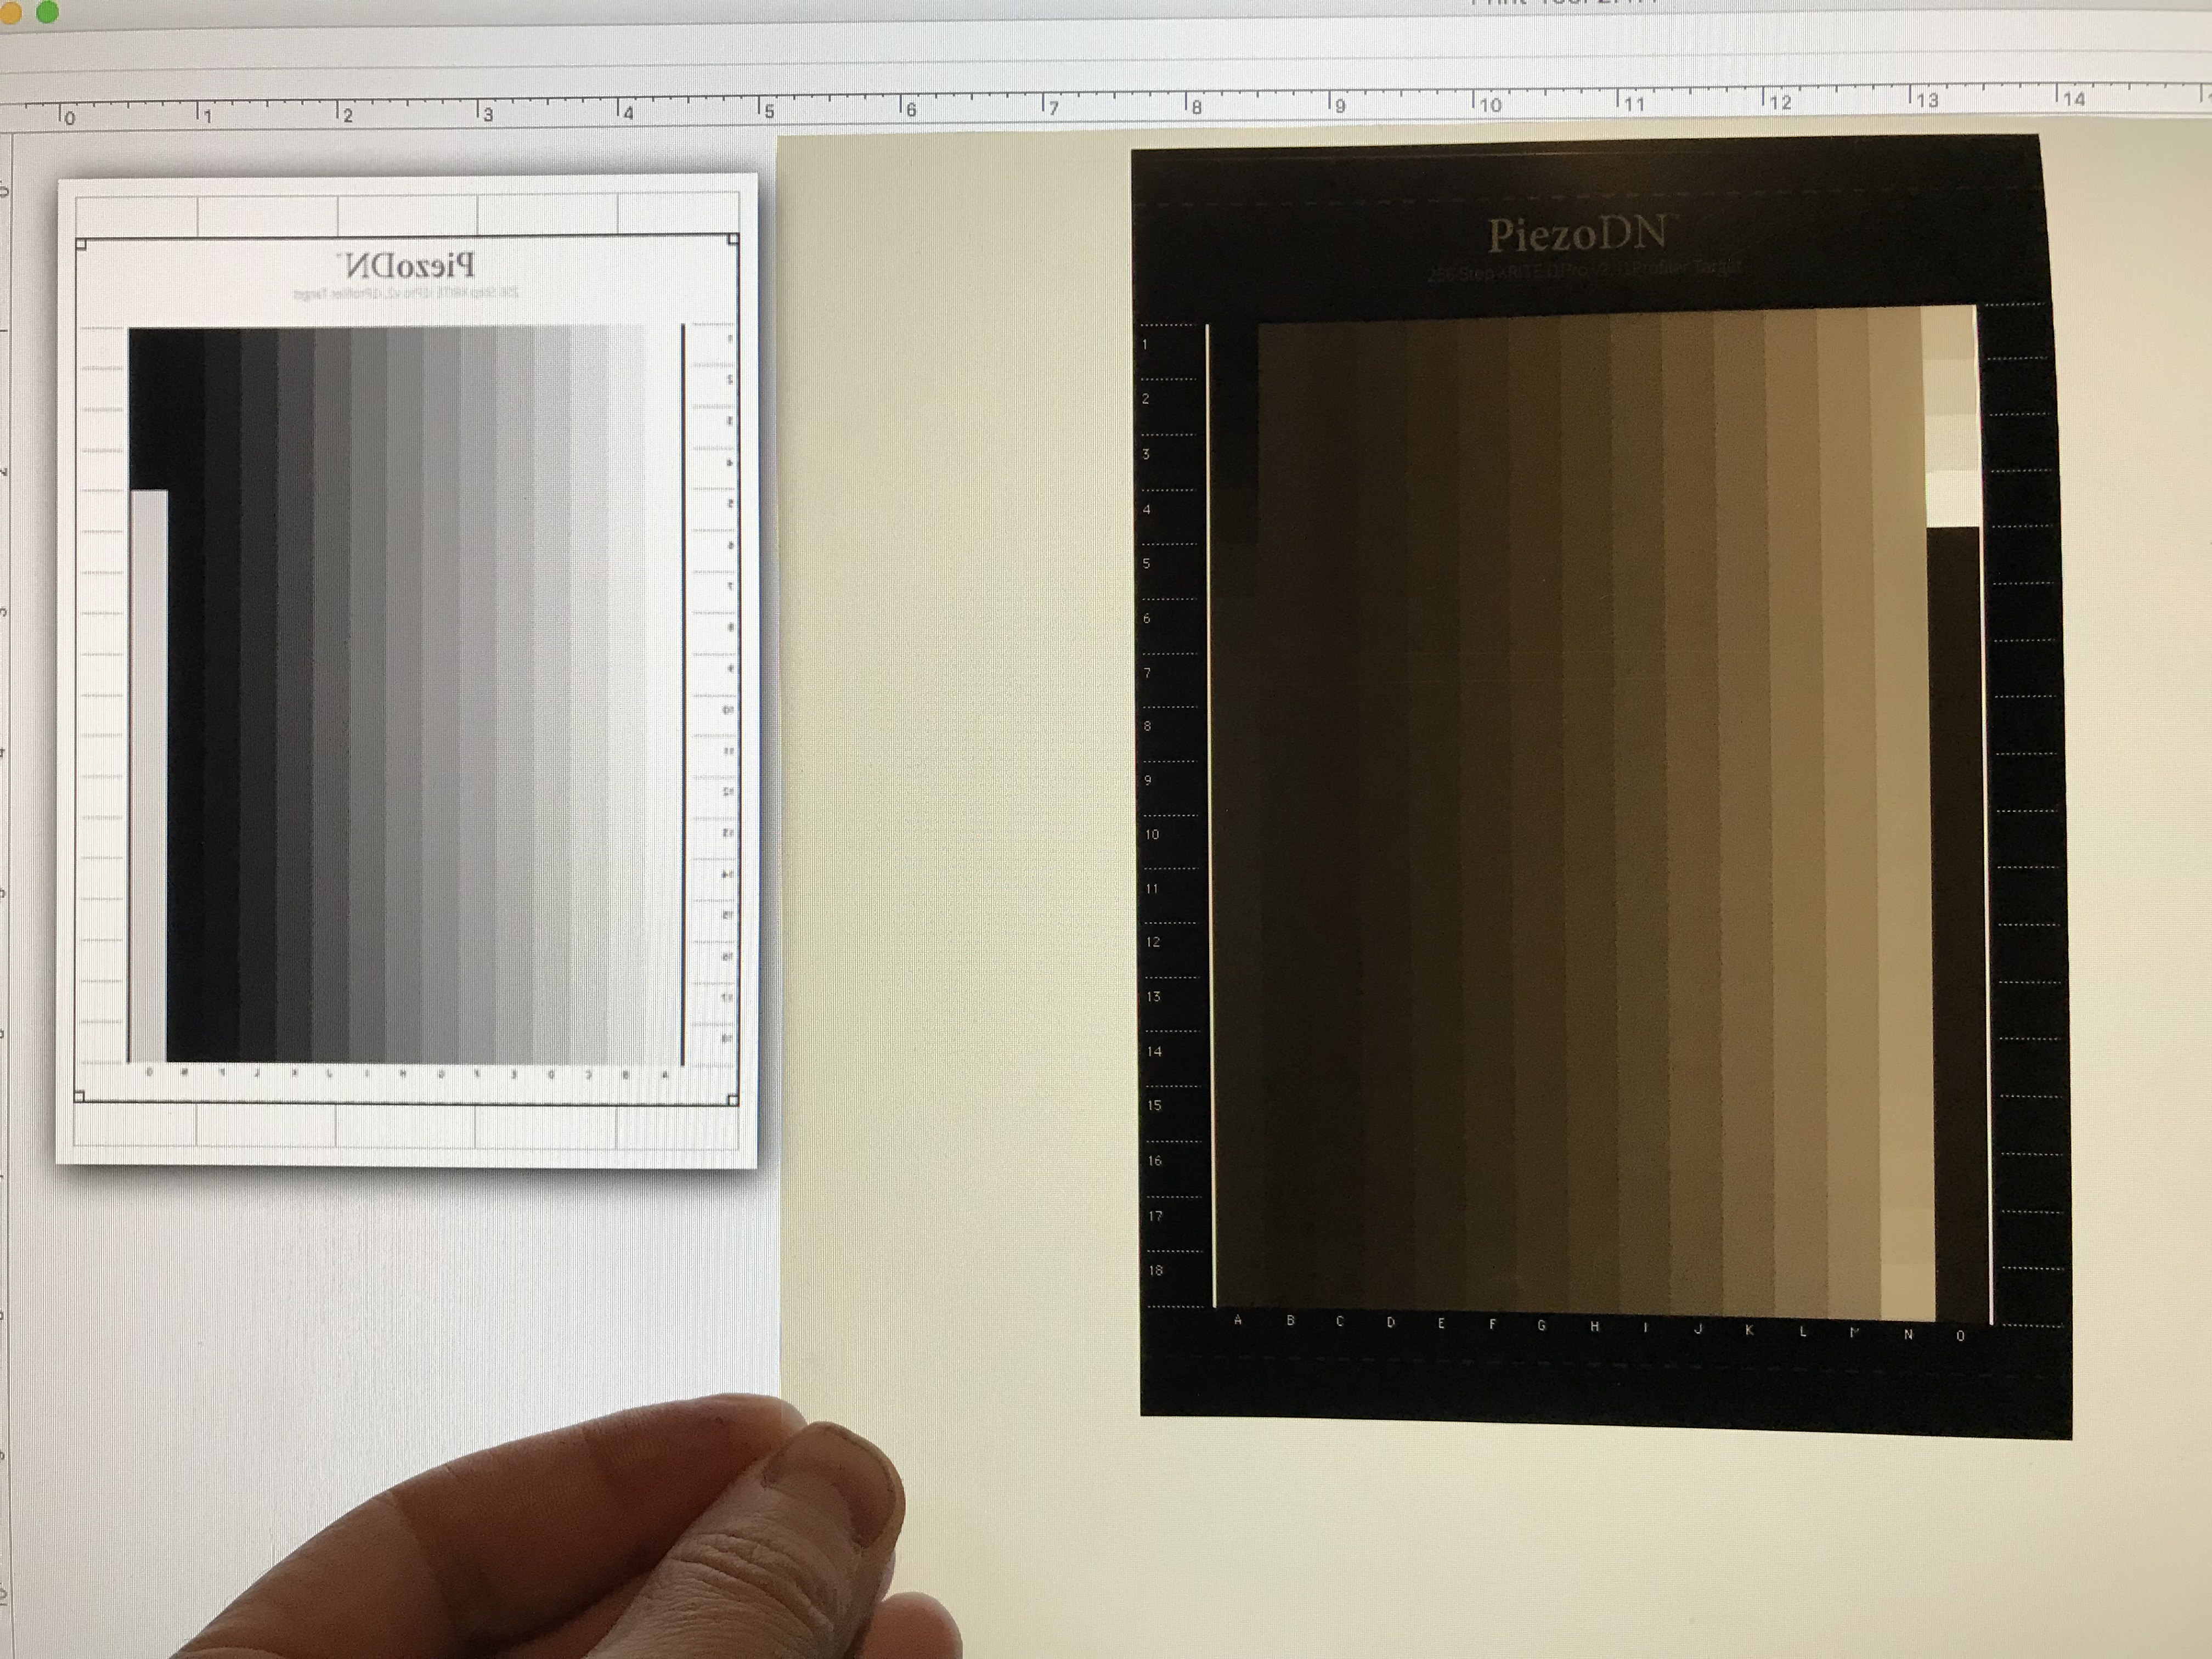
Paper target: Looks good, though I wonder why it printed flipped! I would have expected the inked area to look a bit cleaner too. Is that just due to crude (low-res) scan or picture?
Negative target: ( from the first post) Edges look a bit rough and there are also a pair of horizontal white lines visible in row 7. Just a crude picture or does the neg really look like that? The edges between rows should be smooth and sharp.
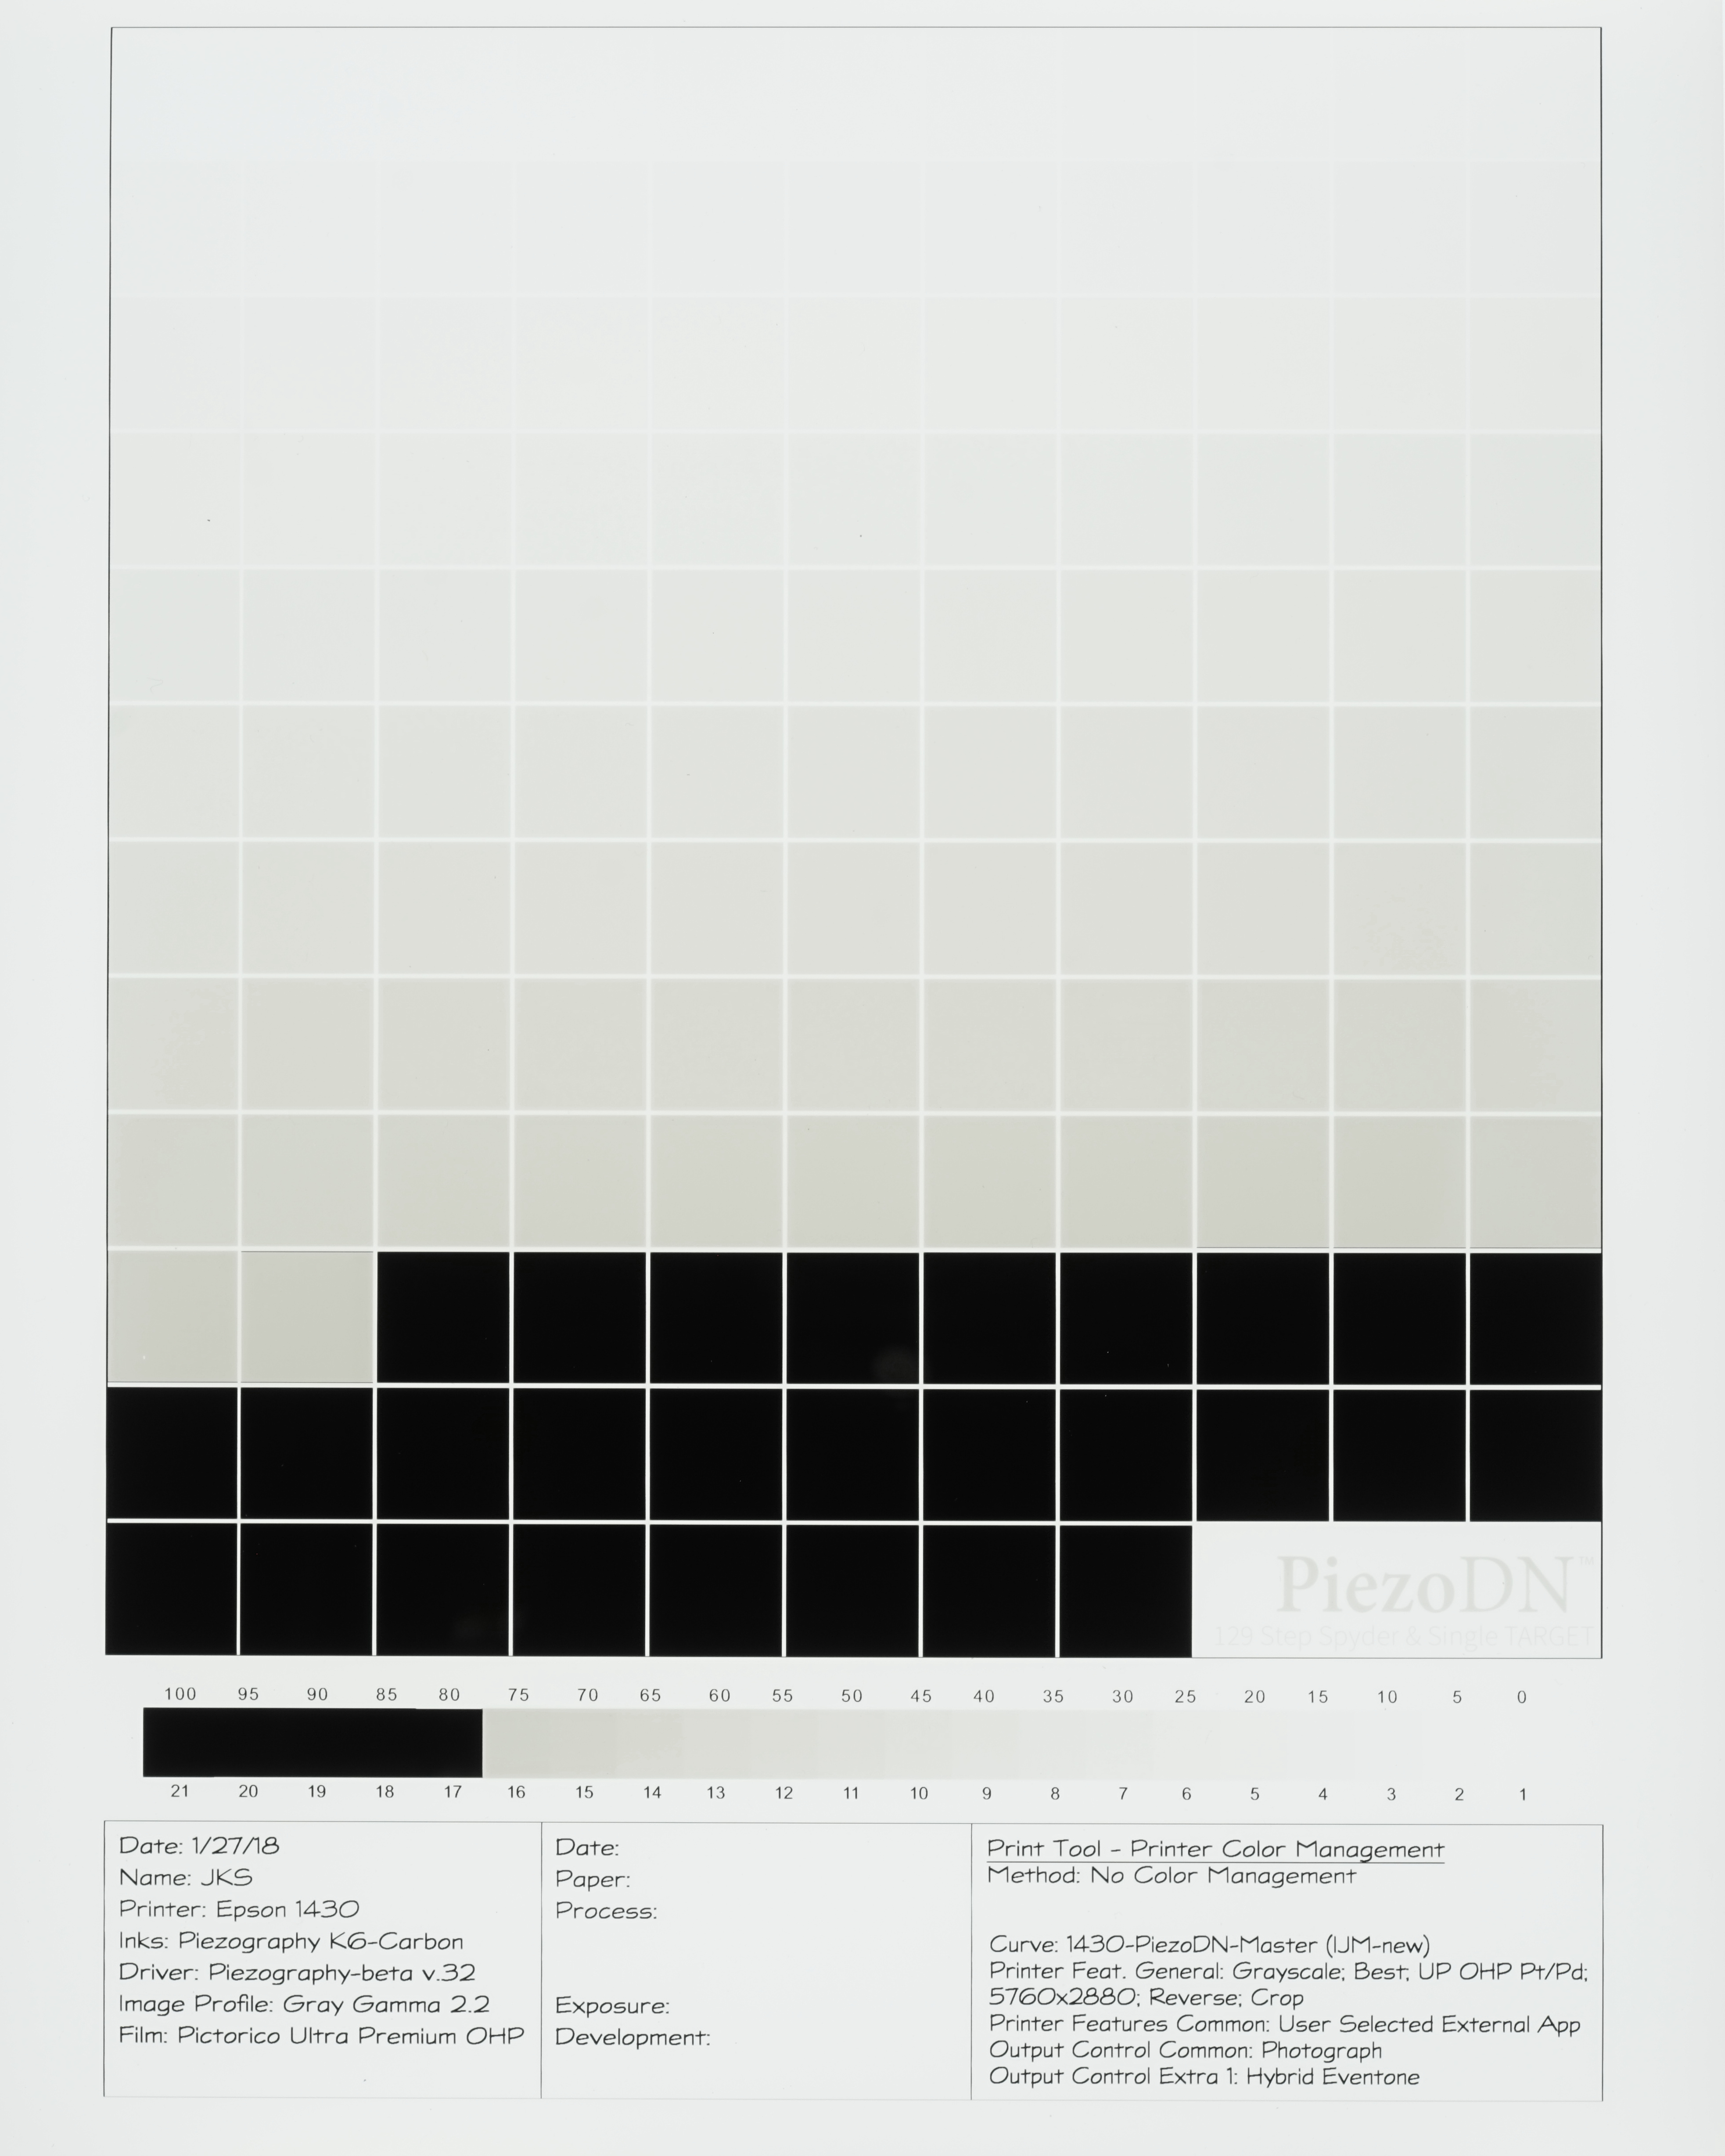
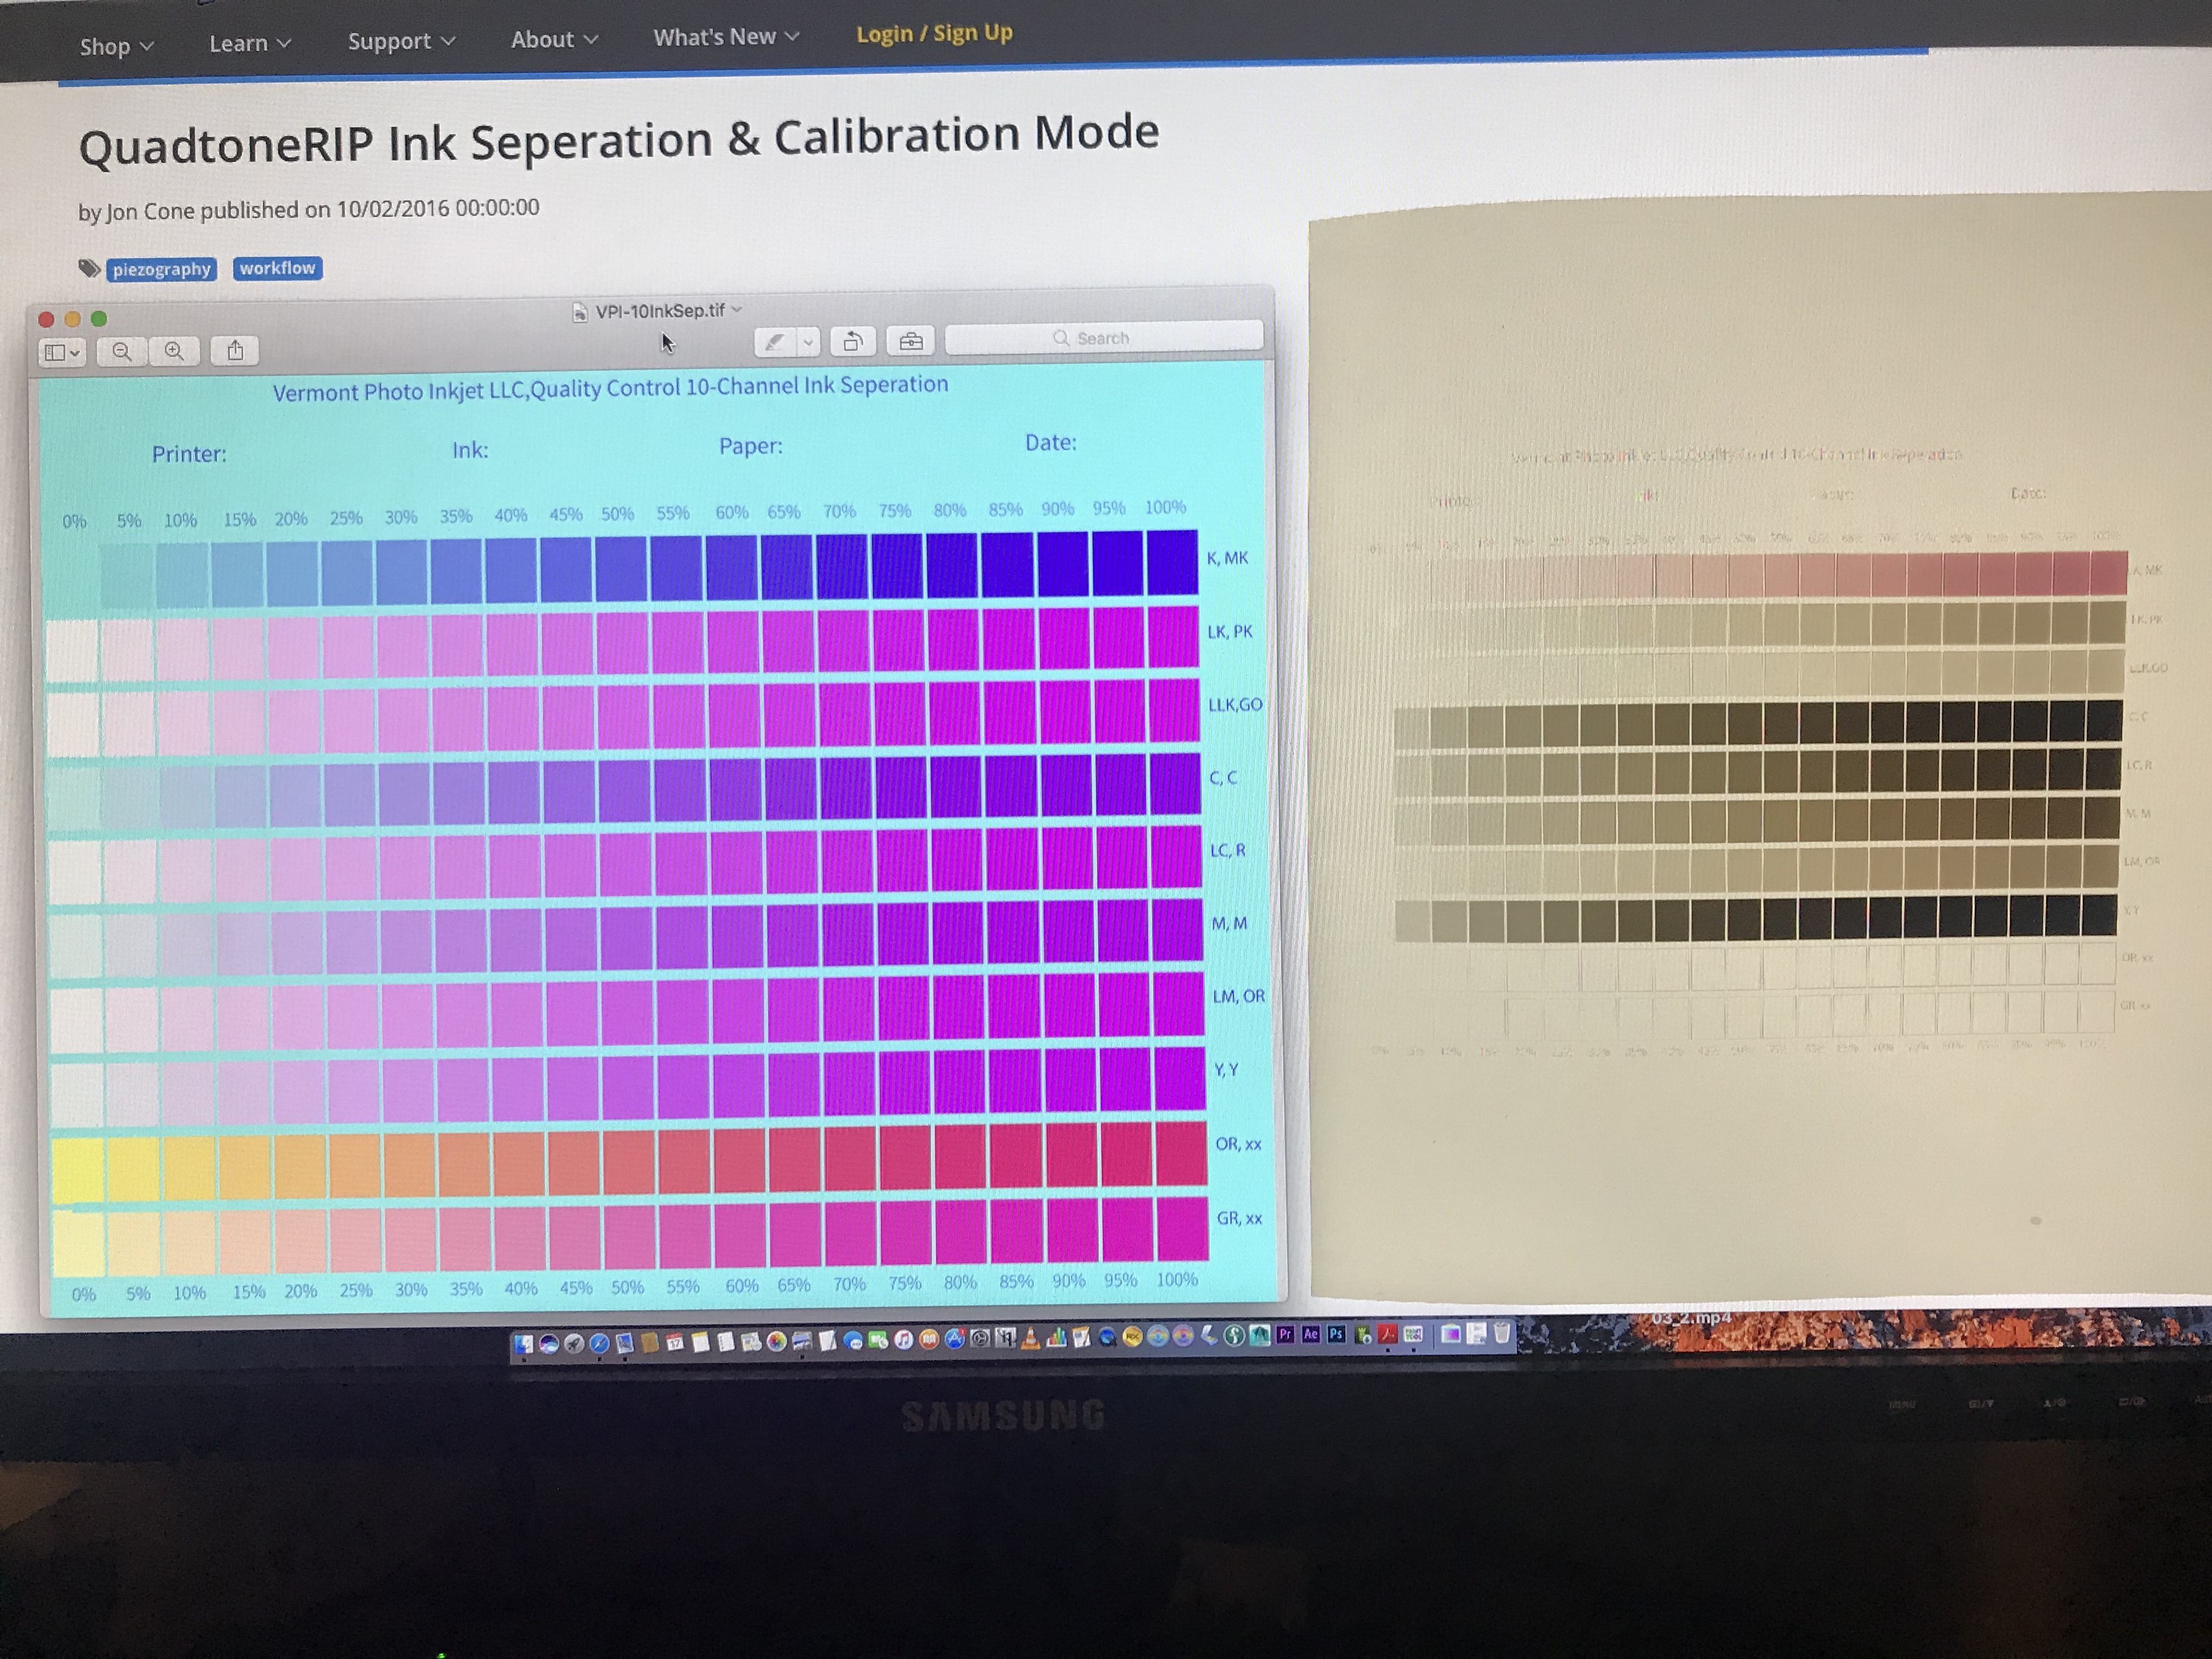
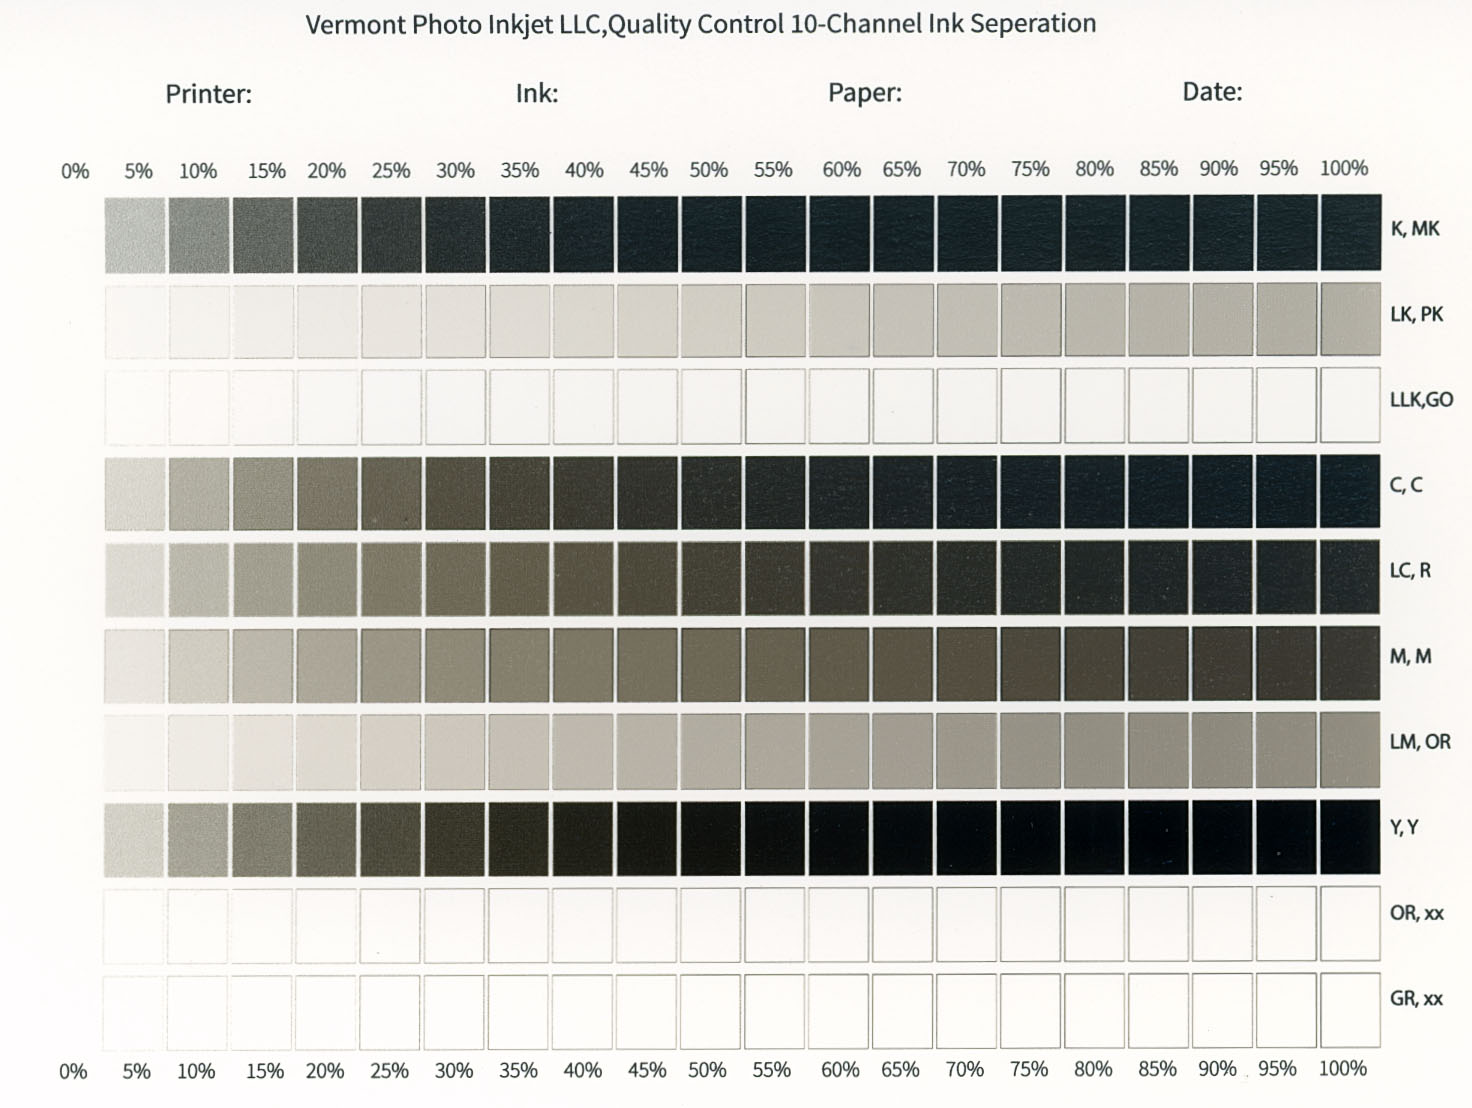
Ink Separation Print: There is tone printing in the LLK/GO channel that should not be there — it should be clear!
Note to Jon & Walker: It’s separation, not seperation. 
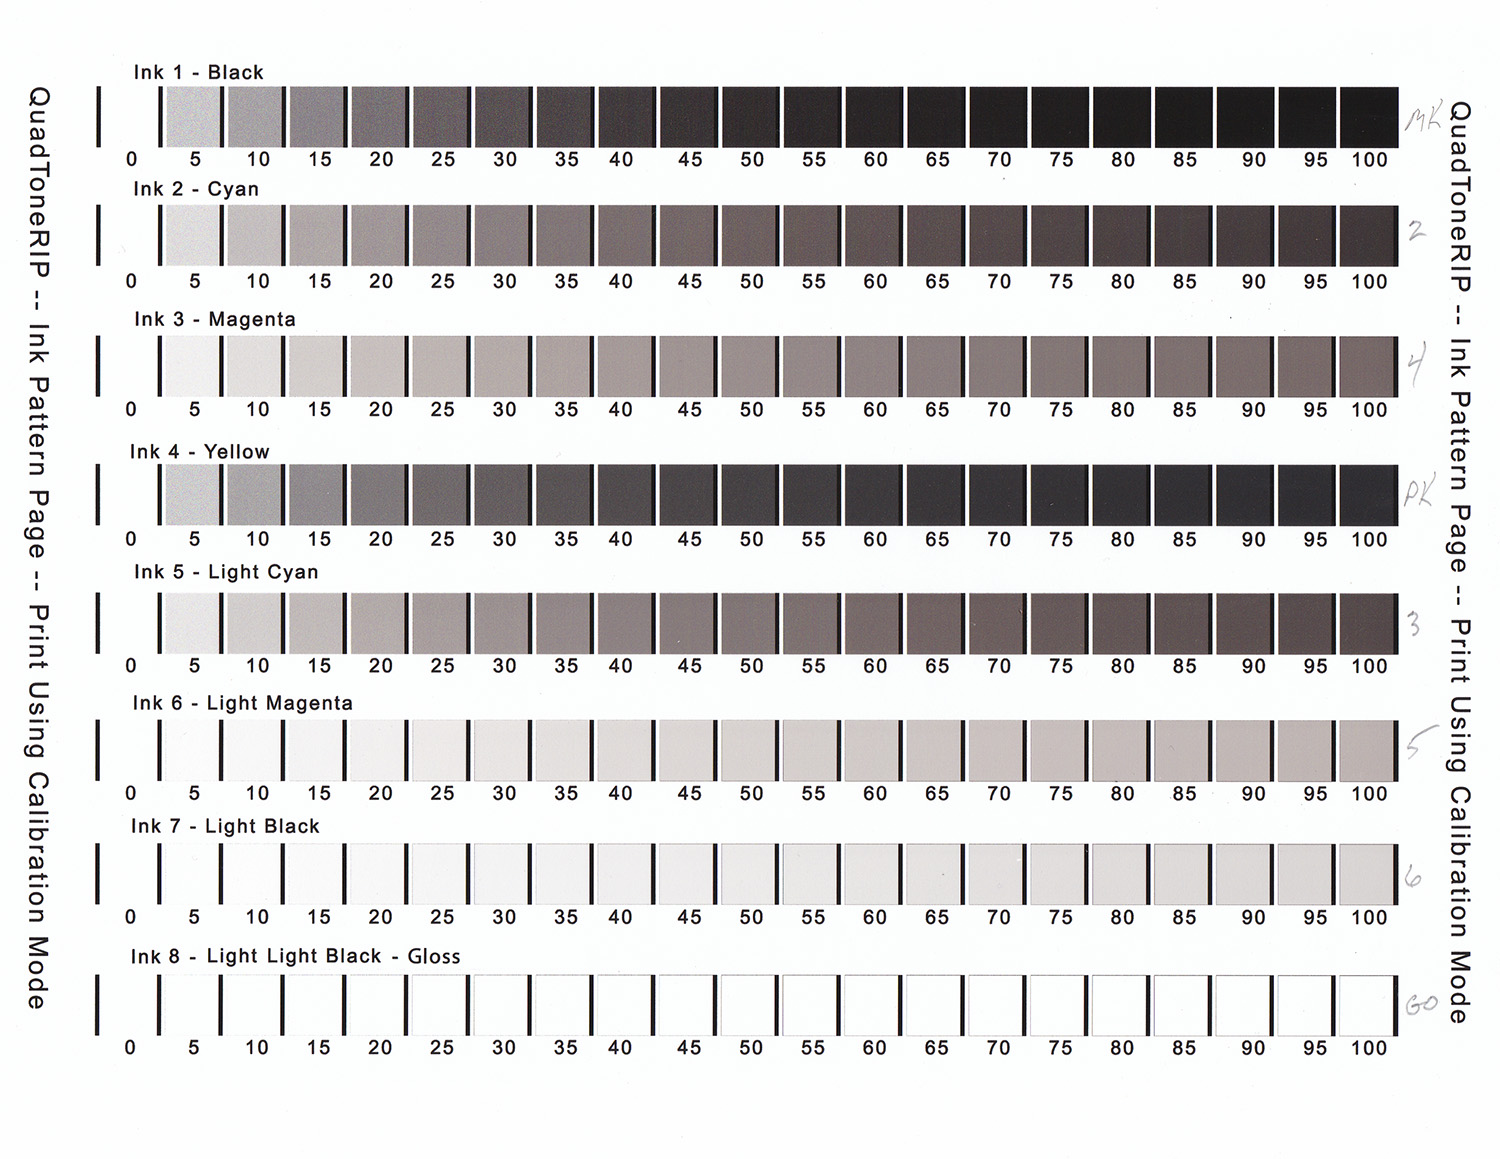
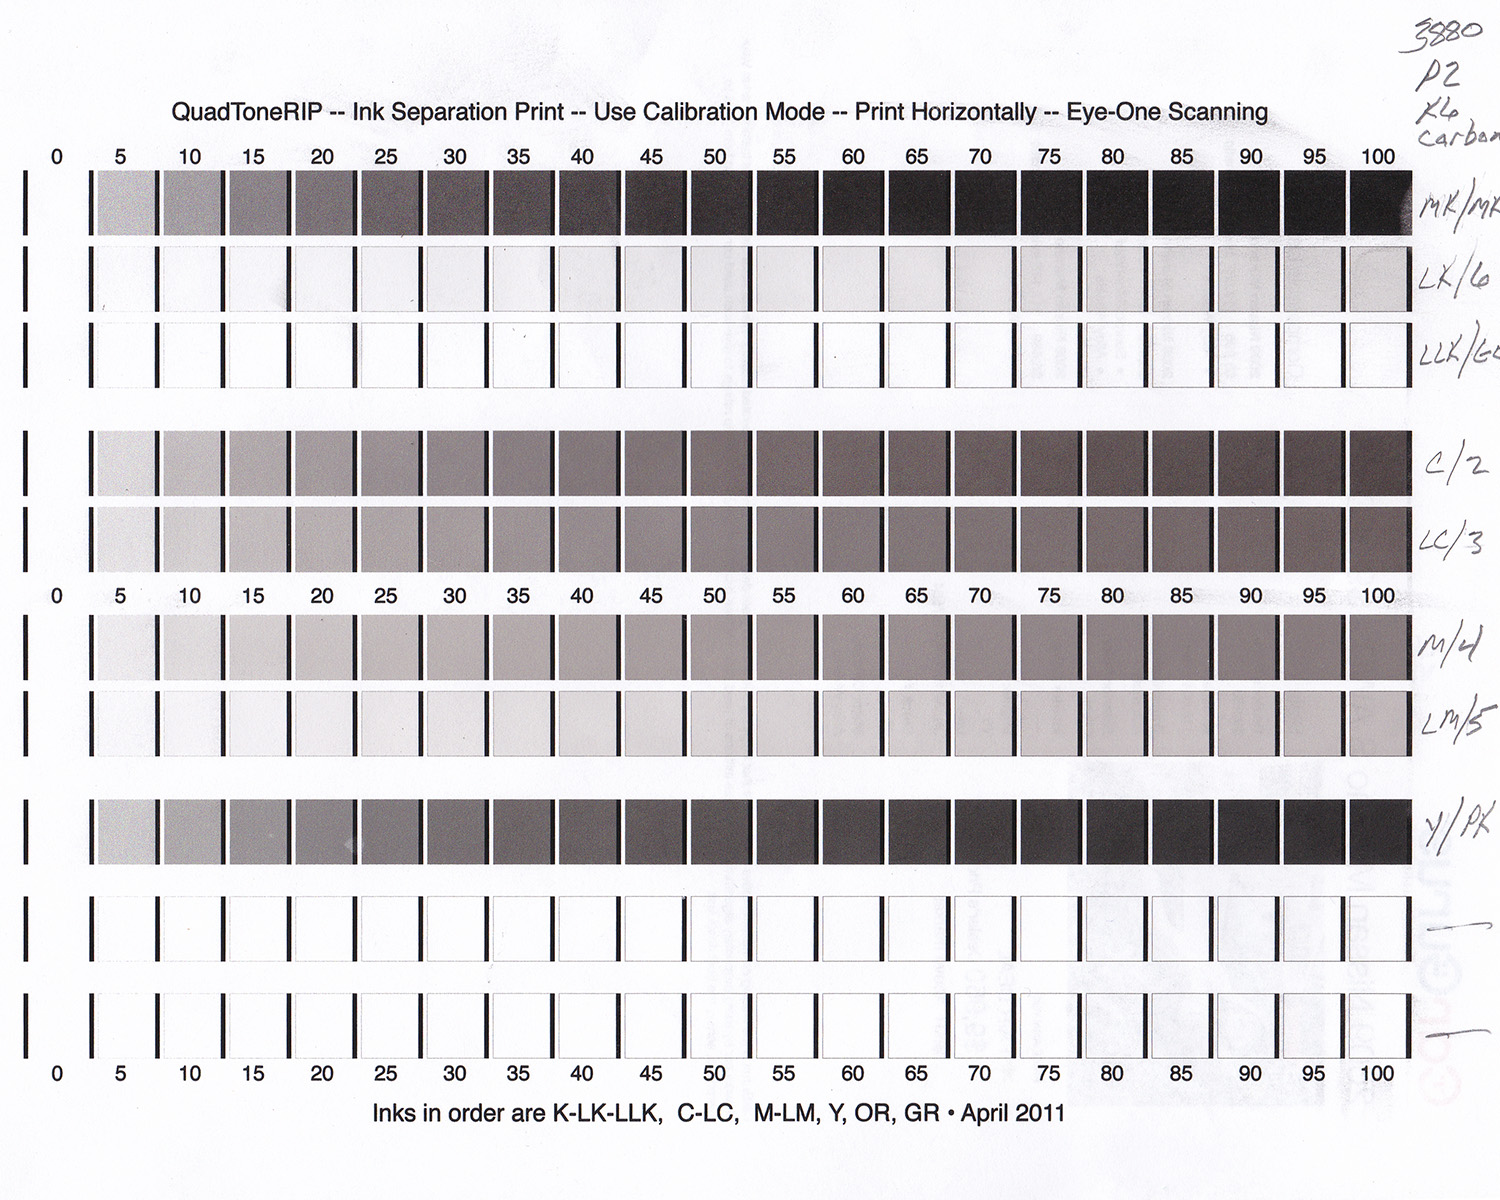
I don’t have that exact version of the test image, but I have 2 others. Here is what they look like printed:
As you can see, neither shows any tone in the LLK/GO channel.
This seems unlikely to be the cause of the strange reversal at the upper end of column B on your negative, but it may be screwing up densities over the entire image somewhat.
That’s all I can think of at the moment. Maybe Walker has some other ideas.
Keith
1 Like
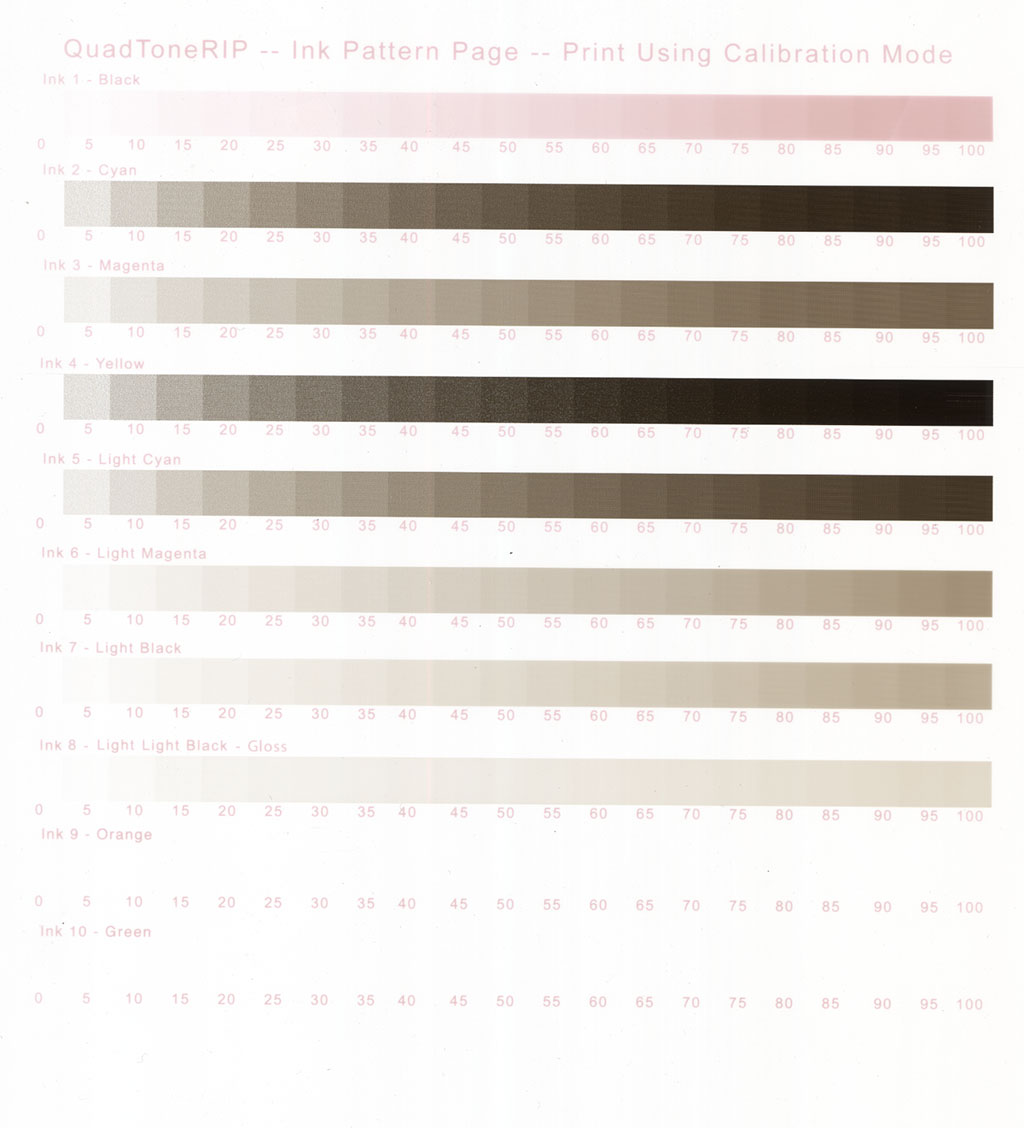
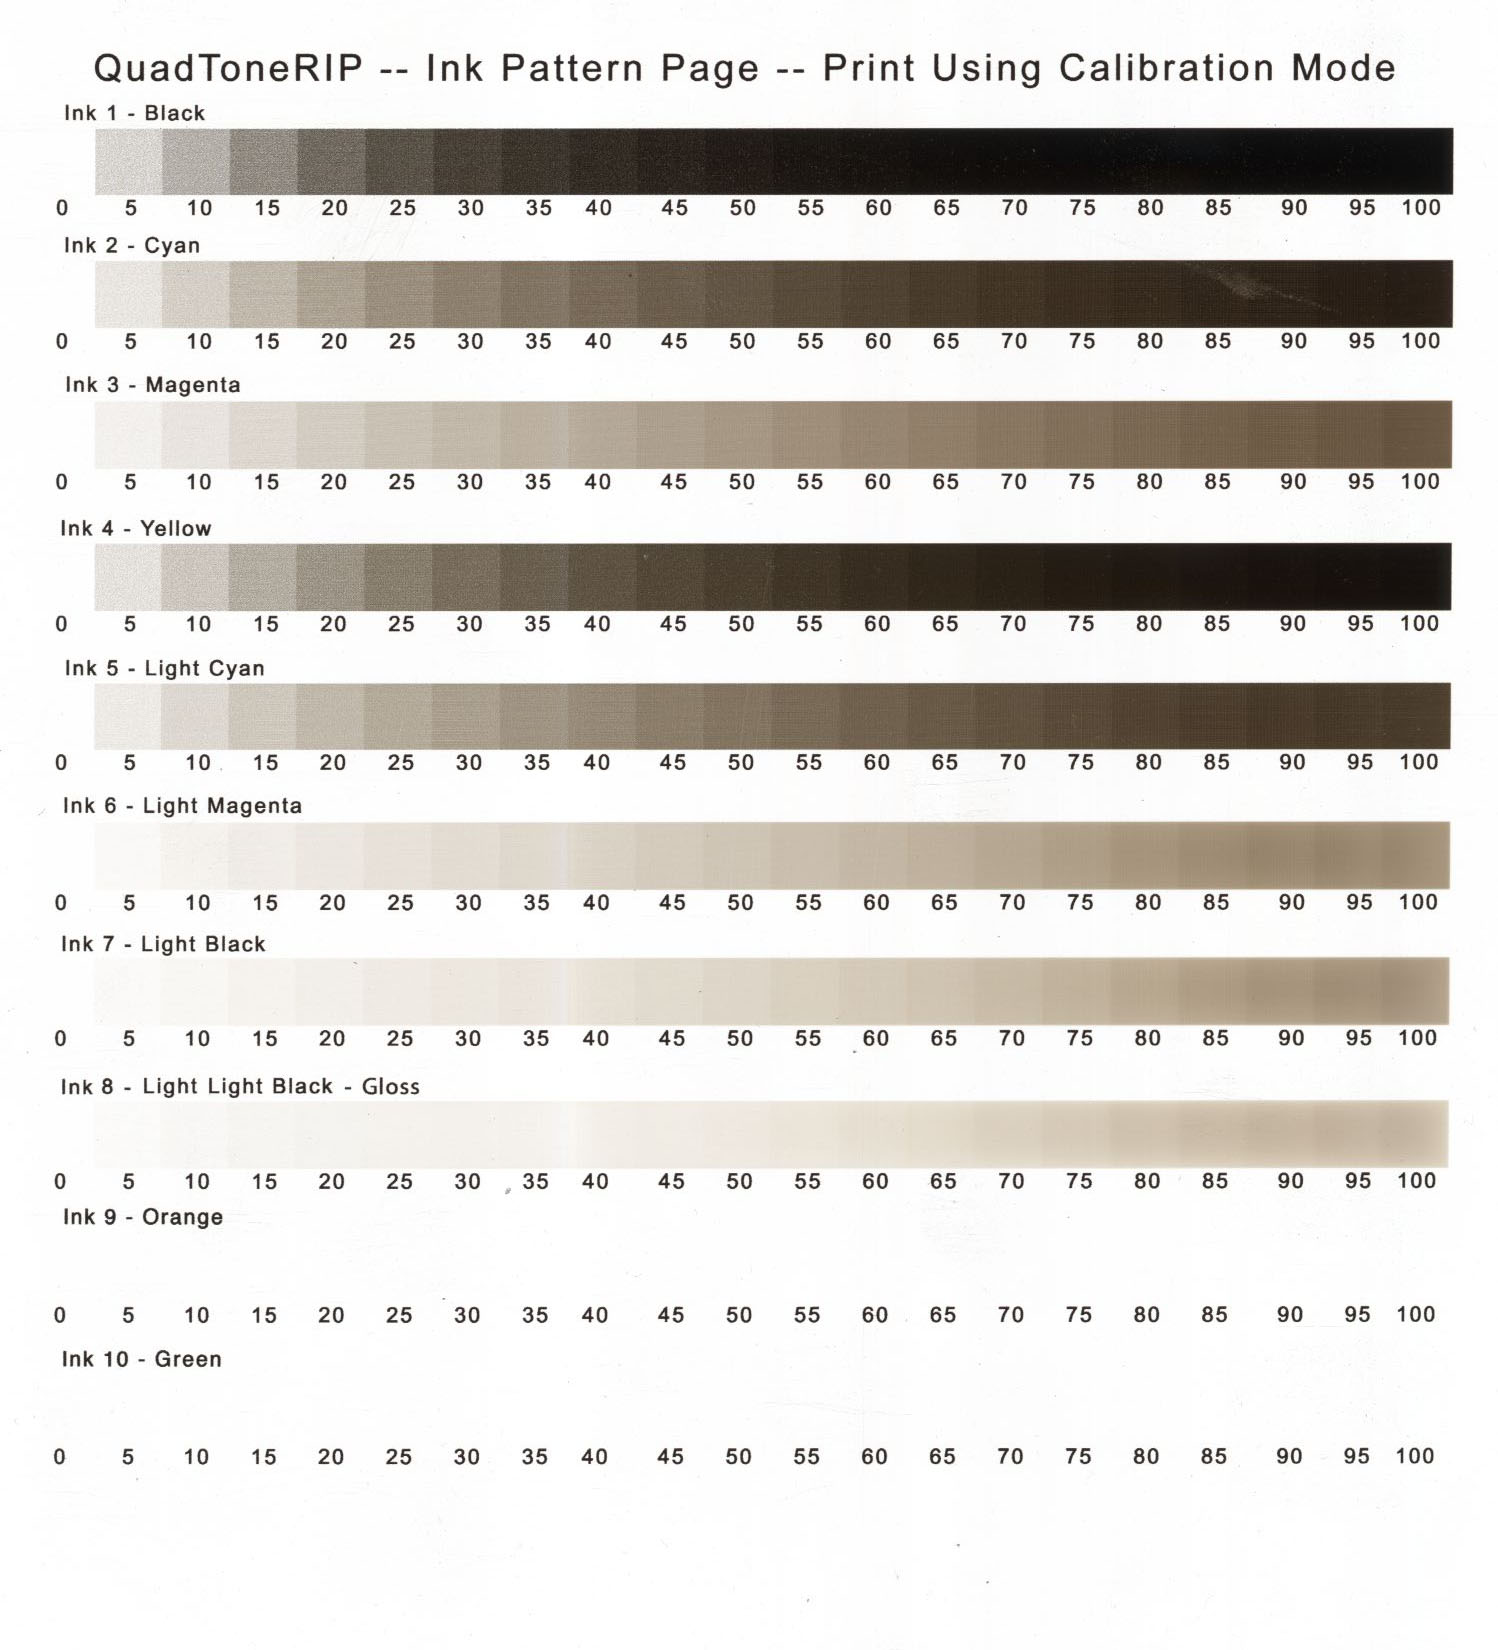
I print the Ink separation test and this is what I get with QuadP800-PiezoDNP2 in calibration mode:
I have the following inks in the following channels:
MK = Pro Matte Black
PK = PiezoFlush
LK = Light Black carbon shade #6
LLK = gloss optimizer
C = carbon shade #2
VM = Carbon shade #4
LC = Carbon shade #3
VLM = Carbon shade #5
Y = HD Photo Black
The image I get in positive using HDP2 is the same… I would expect to get the same image you do above, so I don’t understand what is going wrong. When you say “leave it permanently in MK mode”, can you clarify what you mean? How do I set this mode?
Thank you.
1 Like
Hi Jesse,
Your PK channel is still active — that is why you have pink PiezoFlush printing in the K channel. You need to run a Black Ink Change from the maintenance menu to correct this. See page 138-139 in your User’s Guide. Here are the relevant quotes:
Switch Black Ink Type
Your product comes with Matte Black and Photo Black ink cartridges. Although both cartridges must be installed for your product to work, it can print using only one type of black ink at a time.
Your product switches the black ink type automatically, depending on the type of media you load. Because this process consumes some ink, so you should avoid switching black ink more often than necessary and select a default black ink type for the type of media you print on most often.
Note: To disable automatic black ink switching, press the setup button and select System Administration > Printer Settings > BK Ink Auto Change > Off.
This note is important. With a P2 setup, you never need to change black inks again once you get the MK active in the K channel. (The PF in the PK channel is there only to keep it from drying out.) You don’t want the printer to initiate an unwanted change. In the QTR settings that you access via Print-Tool > Paper & Print Settings > QuadtoneRIP, Black Ink should be set to Installed (or Matte, but never to Photo) since this is what controls which ink is active in the K channel. It does not control which K is used in printing though — the quad selected in Curve 1 does that.
Switching the Black Ink Type
Switching the black ink type takes several minutes and consumes some ink. Check the black ink type media list to select the correct ink type for the media you loaded.
- Press the home button.
- Press the black ink change button.
- Select Proceed and select one of these types of black ink to switch to:
• Photo Black to Matte Black; switching takes about 1.5 minutes
• Matte Black to Photo Black; switching takes about 3.5 minutes
That you are still getting tone in the LLK channel which should be clear if it is filled with GO is puzzling. Maybe @walker has some ideas about that.
Keith
Thank you for this detailed info, I obviously missed that section, thank you for clarifying. If Walker or anyone can suggest why I am getting tone in the GO channel I’d love to understand it. Perhaps when I set the MK mode that will resolve? I’ll test that this afternoon.
THanks!
-Jesse-
ok, thank you for the recommendation, it fixed the black issue, but now I get neither the PZF or the GO. Are there any other spots where I need to check my ink settings that could possibly account for this issue?
1 Like
also, when I search in the Piezography manual, I can’t find that passage, and my PDF viewer says there’s only 114 pages… which manual should I be looking at?
Try this link: https://files.support.epson.com/docid/cpd4/cpd43245.pdf for the User Guide I referred to. It has 209 pages.
You should not be seeing any PiezoFlush, so that is good. It is only loaded in the unused PK channel to keep it from drying out. You won’t be using that channel with your P2 setup at all, ever. I mean never.
The LLK channel, though is a problem. With GO installed there you should not be seeing any tone at all. Could you have residual ink still in the line from a previous installation? What was in that channel previously? Are you sure GO is in the cart? Was this cartridge used for anything else before the GO? I’m just thinking out loud here. 
Find your QTR_Flush_Images folder and open the one named QTR-LLK-flush.tif in Print-Tool. Resize (scale) if necessary so it doesn’t get too close to the edges. Print it in calibration mode – same as you did with the Ink Pattern Page. If the cartridge is loaded with GO and there is still ink in the line that is staining the GO, you should start to see the stain fade as the ink gets flushed out. It may take multiple pages for it to clear completely.
I have another idea about what you could do to avoid the LLK channel completely, but let us know what happens with the flush page first.
Maybe @PiezographySupport will have other ideas.
Keith
Yes, I am absolutely sure it’s GO in that cartridge, I’ve checked and triple checked. Prior to this, I had the Epson K3 ink installed, but that was only to check the printer before installing the Piezo Carbon ink; I bought this printer to only use the Piezo inkset. I did three flushes via the printer’s menu when I first installed, and have since just done tests to try and figure out why I can’t get a proper density on the stepwedge. I have not used any other inks in that spot.
I notice that I have only had to press the reset on the decoder board once when I’ve opened or messed with the inks… it only complained the first time I installed the inks so I reset and at no other time have I had to press the reset when checking or reseating the ink carts. Could it be an issue with the decoder or the ribbon connectors? I’m feeling like I’m running out of options…
-Jesse-
But you did have Epson LLK in there so it might not be fully cleared out. Did you run PiezoFlush through all channels before installing the P2-K6-Carbon inks? Or go directly from OEM to P2? What flush image did you use? The 8-channel or one at a time? Did you try my suggestion above with the LLK flush image? What happened?
I have no experience with decoder boards (my printers are 3880s), but it seems unlikely to me to be the problem here. I have done plenty switching of inksets though. Much more likely that there is still ink in the LLK position. Since this is now the GO position there is no new ink tone to mask any residual ink. You may need to run some PF through that channel then switch back to GO.
Might also be wise to wait for @PiezographySupport to respond here. He is the real expert with this inkjet stuff. I’ve been using IJM inks for a long time, but like you I come from a large format film background.
Keith
Run this procedure on the LLK channel on letter paper with 5 prints.
If you have not run enough ink through your channels this could be the cause of all your problems.
https://community.inkjetmall.com/t/how-to-flush-individual-channel-using-qtr-calibration-mode/2070
I ran a single page on the LLK channel per walker’s instruction, and it came out perfectly clear for GO. I then reprinted the ink separation chart, it still shows ink in the LLK channel.
What am I missing? It’s been 4 months now and I still don’t even have a step wedge that I can calibrate.
-Jesse-
I also reprinted the stepwedge chart and in HDP2 it looks correct… I get a steady increase in density. In PiezoDNP2 I get the reversal where I would expect the densest part of the negative.
I am at a loss.
-Jesse-
Actually, looking at the ink separation chart, it may be correct… ink 3 is magenta in this chart, which is actually channel 5, which has density as I’d expect. Ink 8 is LLK, which is channel 3, and shows clear. So I think this is as you’d expect.
Still getting the reversal in the darks.
-Jesse-
Here are the latest pics now that I’ve set the printer to MK mode and flushed the LLK channel:
10-ink separation positive on Hahnemuhle FA Baryta:
Result of the LLK flush:
Latest attempt at a step wedge:
1 Like
Hi Jesse,
Looks like you got the GO channel cleaned out, so that’s one step in the right direction.
I just scanned all of the previous messages looking for the profile you are using to print the negative but if it’s in there somewhere I can’t find it, so would you please let us know what it is and show the full path to it in the file tree.
Keith
I’m using the P8-P2-PiezoDN-PtPd curve in QuadTone RIP 16-bit mode, with QuadP800-PiezoDNP2 as the printer.