I’m new to all this so sorry if this is dumb question, but every time I try printing the Limiter.tif (I’m looking start making dig neg’s) it comes out with black background*. This is an astounding waste of ink to start with and no matter what I set the background type to be in the preferences I end up with the printer doing a black background against a US Letter sized paper’s worth.
*note - first time around I did this clear-sheet, but it overloaded the things and it curled way too much to be usable, so now as I try this differently each time I test it first on paper and still get black background no matter what the settings are. Ugh
This has been talked about elsewhere on the forum (and is mentioned in the PiezoDN section of the 2018 Deluxe manual installed with your copy of PiezoDN) but basically what you need to do is this.
Make a black image in photoshop that is exactly the same size as your film.
Import into Print-Tool (first image) and set the size to 100%. You will see a “clipping warning” ignore that.
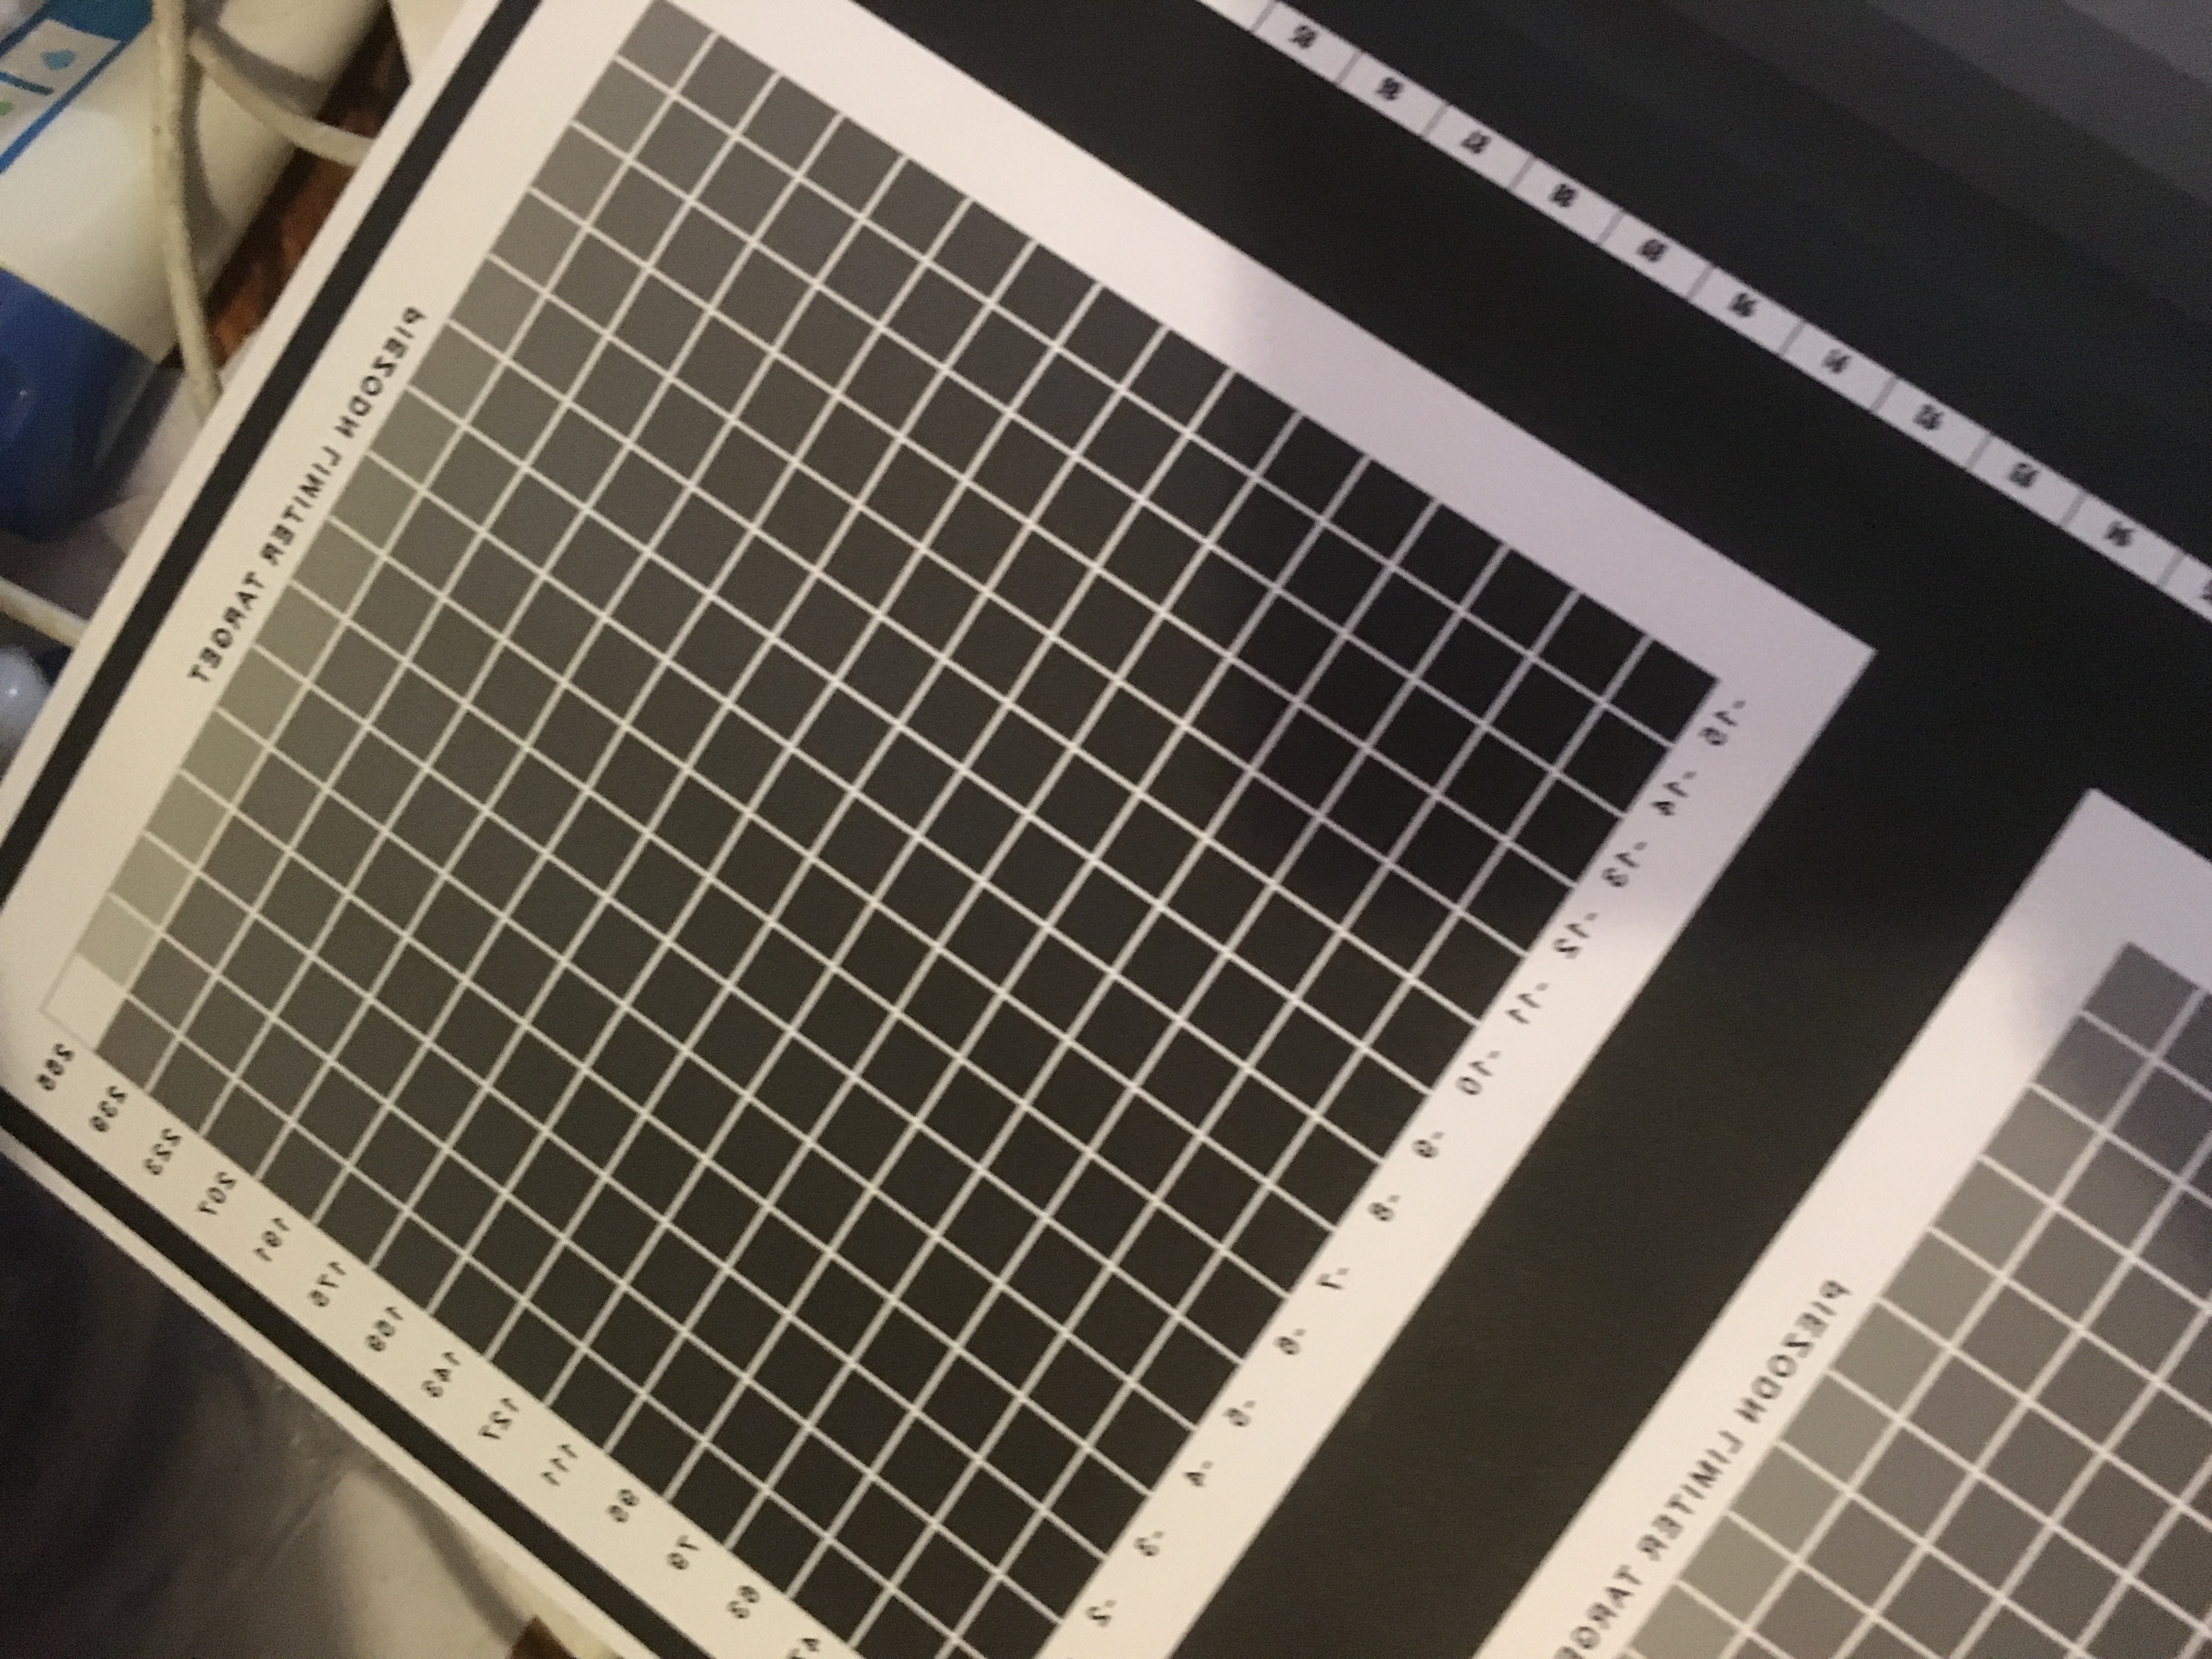
Import your limiter target.
Always leave 2" of space at the bottom of your film clear of any image (other than the black tiff) to allow for no ink on that area.
Curl the corners of the film away from the emulsion (all 4) before printing.
If I may add to Walker’s reply, do not use Print-Tool’s negative preference features with PiezoDN - they will not behave as intended since they are made for use with standard methods of making digital negatives in which a negative image is sent to the printer. With PiezoDN the quad curve performs the inversion which is why a black border is necessary in order to get a clear (un-inked) margin on film.
If my memory is correct, the current version of Print-Tool was released shortly after beta-testing of the original release of PiezoDN began 2.5-3 years ago. When I upgraded to this version of P-T I tried the negative functions to see if any were of use with PiezoDN and found that they are not.
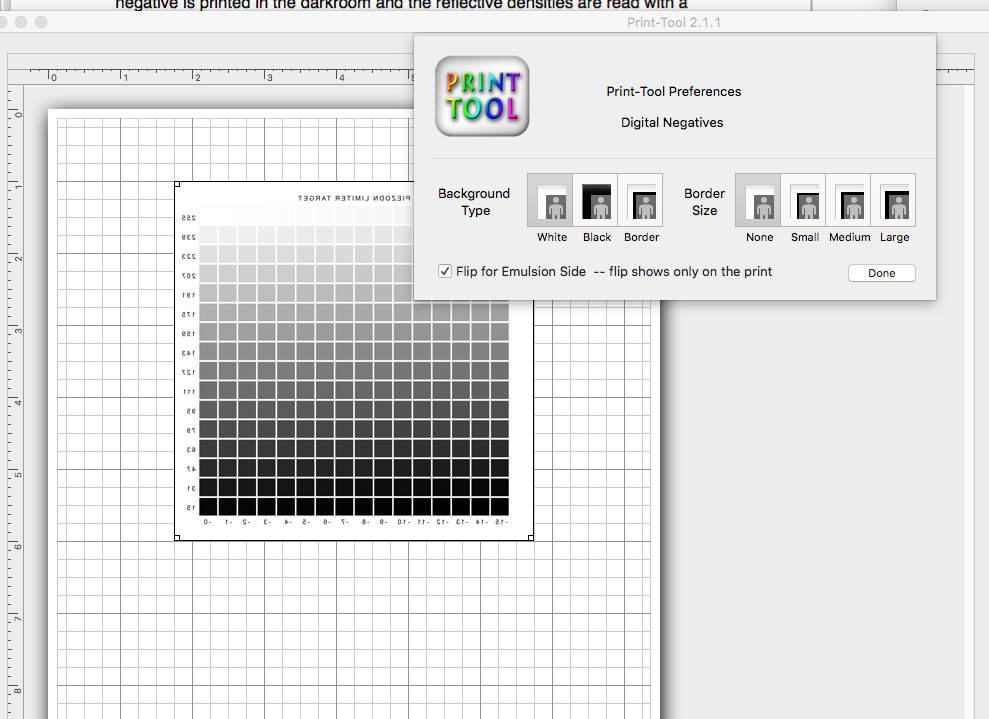
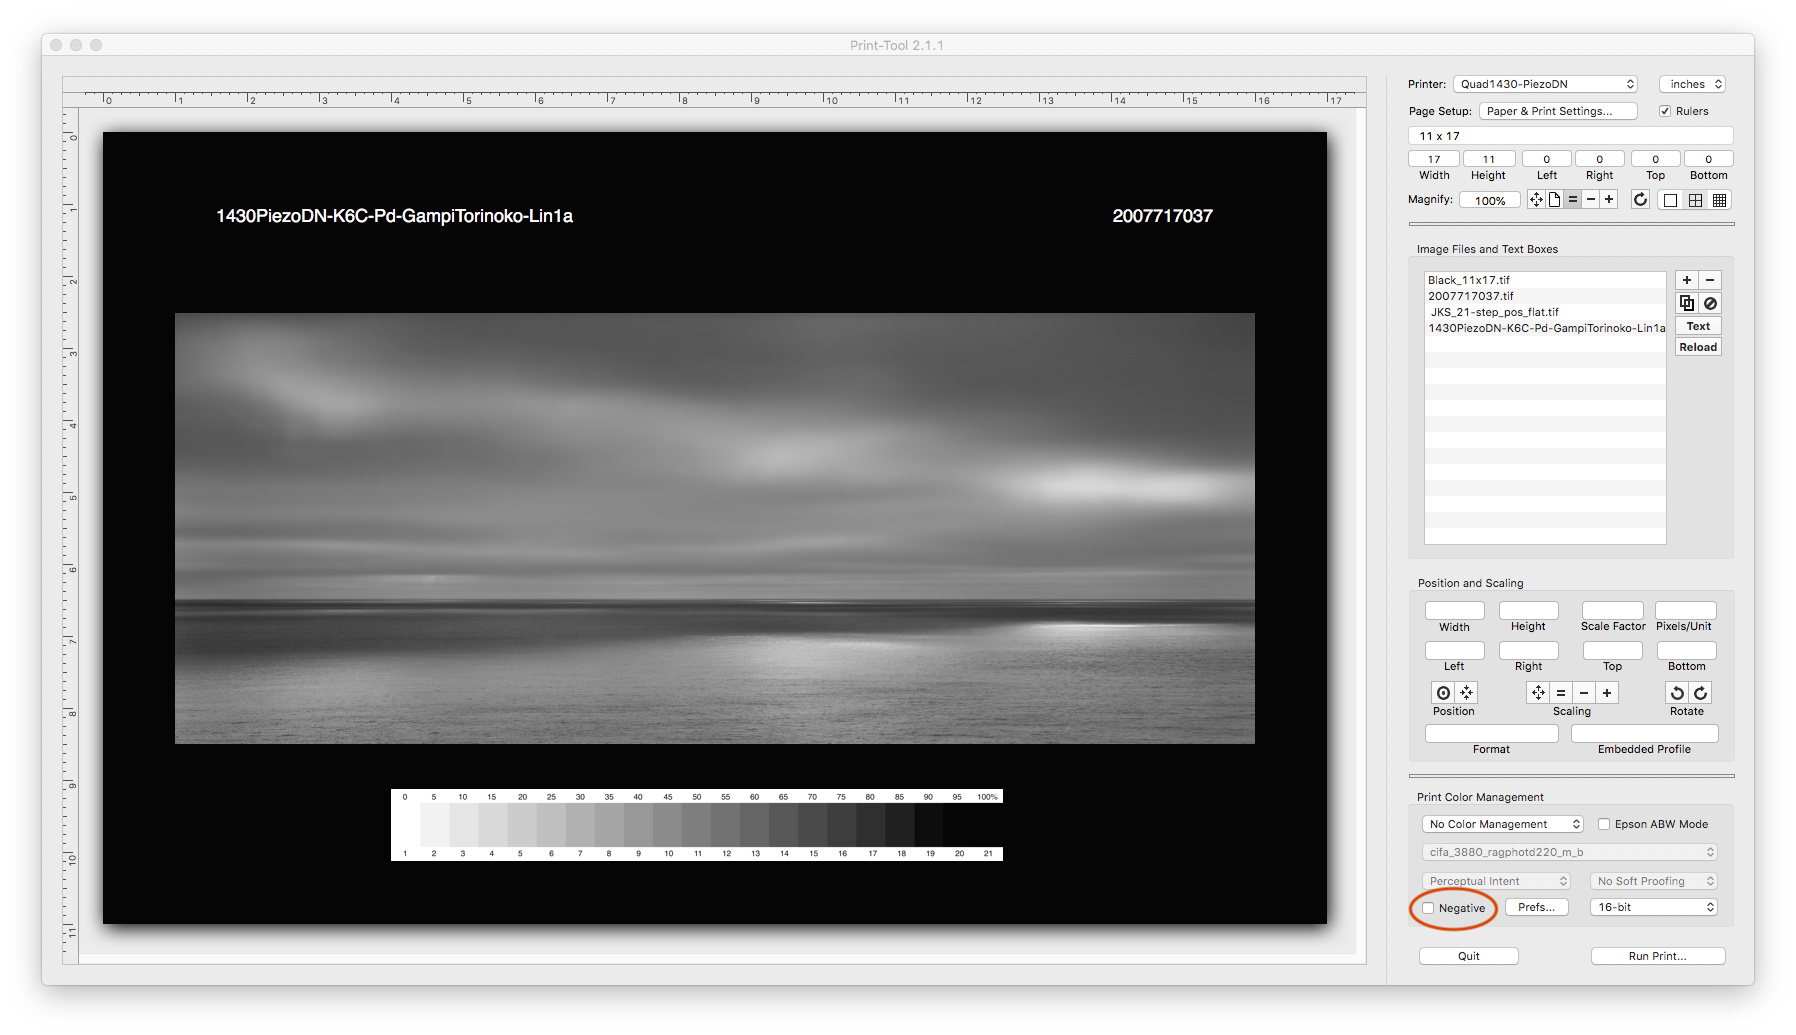
Here is a screenshot of how I setup P-T for a PiezoDN negative:
Note the 4 layers in the Image Files and Text Boxes area. Only the top 2, black background and image, are necessary to print a negative with a clear film edge and no mask. The text and 21-step strip are things I find useful. Also note that the Negative box (circled in red) is not checked. This means that the Negative Preferences function is not active. This is important.
If you want a black printed mask around the negative to print a clean masked edge (without having to use a separate mask of rubylith or some other UV opaque material) you would add a white rectangle of something like 1 inch larger in both dimensions than your image size between the black background mask and the image.
Both the black background and any white mask can also be added to the image file by increasing the canvas size with the appropriate color, but Walker 's solution to this of using a separate layer in P-T is very elegant and also allows for easily adjusting the layout.
I’d also like to point out that Walker’s recommendation of a 2 inch bottom margin (right margin if printing in horizontal orientation as in my example) extra cautious - there seems to be quite a bit of variation in this regard among printer models and even different units of the same model. It is partially due to a QTR limitation regarding printing close to leading and trailing edges - generally 1/2 to 1 inch of unprinted margin is required to avoid banding in this area. But the other part that is more significant for us is the paper-feed mechanism and whether or not we need to disable the star-wheels to avoid marks on the negative. For example, on my first 1430 with the star-wheels removed, I needed minimum leading and trailing margins of 1 inch and 2 inches respectively. On my second (current) 1430, I tested for star-wheel issues before doing anything else and found to my surprise that there were no marks. This allows me to print as close as 1/2 inch on the leading edge and 1 inch on the trailing edge. On my 3880, with star-wheels disabled I have found the practical limitations to be 1/2 inch leading and 1.5 inches trailing. I guess my point is that it is worthwhile to test this for your particular printer.
That is my negative catalog number (and the file name) and it is part of the text line in the example. I just separated it from the curve name with a bunch of spaces. You could also use a separate text box.
I noticed your image and step chart are not flipped. I assume that you flip them using the print tool dialog? I must be doing something wrong because that does not seem to work (and instructions in the PiezoDN section of the 2018 Deluxe Manual says to flip the image in PS).
The other thing to add is that adding a white background image (to print a black mask for clean edges) also does not work in Print Tool for me. Some user error I suspect, :-), but can’t figure it out.
It’s been a long time since flipping images in Ps has been necessary with QTR/PrintTool. I think the Flip Horizontal function in QTR even pre-dates PrintTool. I guess we could say it has been hiding in plain sight since it seems few have noticed it.
As for the masking border in PrintTool, the order of layers matters, and you cannot move them in PT the way you can in Photoshop. The Black layer must be opened first, then the White mask (if used), then the image layer and the text layer (if used).
If you add a white border to the image file (and save it that way) it should print with a black border, if you are using QTR. The beta-driver has some different behaviors, such as it does not fill the area outside the image with black ink if you don’t mask it out, though if you add a white border to your positive image it should still print as black.
It appears I forgot to fix the “255-253” white bug… I wonder if this would cause the background not to print black, hmmm. That is the only difference between when it work and today when it didn’t.
Time to run another experiment (but first I have to cut some more film), :-).
Aha! It was not clear that you were using the beta-driver, and the original context of the thread was standard QTR-PiezoDN. But yes, that is exactly what would happen if you forget to make the 255->253 adjustment to the file before printing. 255 is pure white in the image file and therefore pure black in the negative, except for the bug which leaves it (and presumably 254 too) printing white if you do not make the adjustment. I know this because I’ve made that mistake more than once. A couple times I got away with it because there was no 254-255 data in the image file, but when there was things looked a bit peculiar in spots.