I have some very slight fogging apparent on my PtPd prints. That is, some tone remains after clearing in the print border, even when the sensitizer is covered with Rubylith film during exposure.
Background:
It’s not the neg curve. The problem was first evident in the margins of my print, and so I assumed that the neg border was not dense enough. (ie a curve problem). I ruled this out by testing a print covered partly with Rubylith, which should prevent UV light transmission. The problem still persists.
It’s not the darkroom. I have carried out exhaustive tests to see if there is a stray UV source in the darkroom. There is not.
The problem is more apparent when the paper is wet. I am using Legion Revere. After the paper has dried down, the problem ALMOST disappears (but not quite).
Could it be that the sensitizer itself is fogged slightly? It is stored in a brown bottle in the darkroom, with the lid on whenever the darkroom door is opened. It does not receive UV light in the darkroom, but perhaps it could have happened before I received it.
Are you sure it’s fog and not stain? Fog can be from light or from sensitizer going bad. Stain is from insufficient clearing and usually has a very faint yellowish tinge.
Has any part of your process changed between previous non-fogged prints and your current fogging problem? This includes new batch of paper, new sensitizer (either pre-mixed or not.)
What chemistry are you using? DOP (ferric oxalate) or POP (ammonium ferric oxalate)? How old is it?
What is your clearing sequence?
What is your room lighting? There is a well-known alt-process supplier that uses fluorescent lighting in their darkroom. They don’t think it causes fogging, but after testing some paper in their darkroom several years ago, I can say as an absolute fact that it does. I brought my own chemicals (purchased from them) and used my then standard low contrast mix (DOP with a miniscule amount of Na2Pt as a restrainer). Under the fluorescent room light I got bad fogging though they swore they never got fog. Found a clamp on incandescent fixture, turned off the fluorescents, repeated the test and had no fog. Later I found out that they use a huge amount of Na2Pt in their standard mix for printing digital negs. The high level of restrainer is what they need to compensate for the fog produced by the fluorescent lighting.
More information is needed to help you diagnose the source of your fog problem. Please be as complete and specific as possible.
Thanks so much for reviewing this. I had to dig deep to review the process and make sure that I’m not making any obvious errors.
Pretty sure it’s not stain. No trace of yellow. It’s a tone in about the 3-4% value and exactly the same color as the print color.
No change in process, same paper batch, same senstizer, humidity etc.
Using the POP method. Senstiser came from Jon at Inkjetmall and is less than 3 months old.
Using a 3 bath clearing method as described by Pradip Malde. 10 mins in EDTA Disodiumj, 15mnins in sodium sulphite, and then 15 mins in EDTA Testra. Wash is 30 mins.
I hear what you say about using Na2 to violently clear fog. It just masks the problem.
I got myself a UV light meter. My exposure is about 1700 “doses”. The lighting in my darkroom adds up to about 4-6 doses over 10 minutes (that is about the max time I have a coated sheet exposed to light in the room).
The other information is that the fog is very apparent when the paper is wet ( and therefore somewhat translucent). But the fog is easy to miss after the paper dries. I am using Revere 22x30 and I think it is 310 gsm.
Do you know if the brown bottles that store the chemistry are safe for UV light? Could the chemistry have gradually fogged in the bottle?
Hi Walker, I think it may be the neg. Where I try to add some extra rubylith on top of the black border of the neg, I can make out edge line where the rubylith meets the neg, (with no tone under the lith and some slight tone under the neg).
Can you have a look at the curve? The K channel seems to be high enough, but some of the other channels drop off rapidly at the black point. Maybe those need some boost to make the black stonrger.
The curve is otherwise a really really great linearization…
This seems to contradict the statement in your last post where you say:
While it may be true that there is insufficient Step 1 negative density, which is the same as the masking edge density, I think that is unlikely unless you have somehow lowered the highlight start point in the course of linearizing your curve. It would be helpful to know what starting curve (Master) you used as well as to see the linearized curve you are using which Walker has already requested. If you have a film (transmission) densitometer, or know someone from whom you can borrow one, your film Dmax should be in the neighborhood of 4.0 +/- 0.3 (one stop) using any of Walker’s PiezoDN Master quads for this process.
There is one thing from your earlier reply to my questions that stands out to me:
Your meter must be different than mine (LightMeasure PPM-2) since my exposure for M-W Pt/Pd on Revere is on the order of 5-7 times what yours is measured in “doses”, for all of several variations I’ve tested with a Stouffer 21-step, and is 12000 for the one that I have linearized: V1 sensitizer with straight Pd hydrated at 52% for 90 minutes. (After almost 3 years of working with the M-W process, I am having to start over with digital negative calibration due to being forced to change inksets.)
My meter doesn’t read any ambient UV light in my darkroom over the course of an entire day. That you are getting 4-6 doses in 10 minutes suggests that you may have an ambient light problem. What kind of room light is in your workroom? You don’t need a safelight but fluorescents can be problematic, incandescents should not be a problem, but LED bulbs must be chosen carefully since many do have some UV output. In all cases, indirect lighting (bounced) is preferable to direct, in my opinion.
I did send the curve to Walker, who came back to me that the curve seemed good to him.
For the UV meter, I bought something called a “Lightmeasure”. The meter is a kind of closed-loop system whereby the units don’t really have any meaning. I can’t compare my “doses” to your doses unless you happen to have the same meter. (Let me know). It could be that the absolute density of the black on the neg is not sufficient and that my highlights have drifted lower during the iterations of linearization. I don’t have a densitometer to measure this. However, I do have an Xrite sensitometer and the white point on my print has the same luminosity as the paperwhite.
There is however a problem that lies somewhere in that contradiction that you mention.
The “fogging” at the edges almost disappears when the paper is dry. (I mean it’s REALLY hard to see). Although it is clear there while the paper is wet. I wonder if it is that the sensitizer is getting a very slight fog on it but it is so deep in the paper fibers that it cannot be seen when dry.
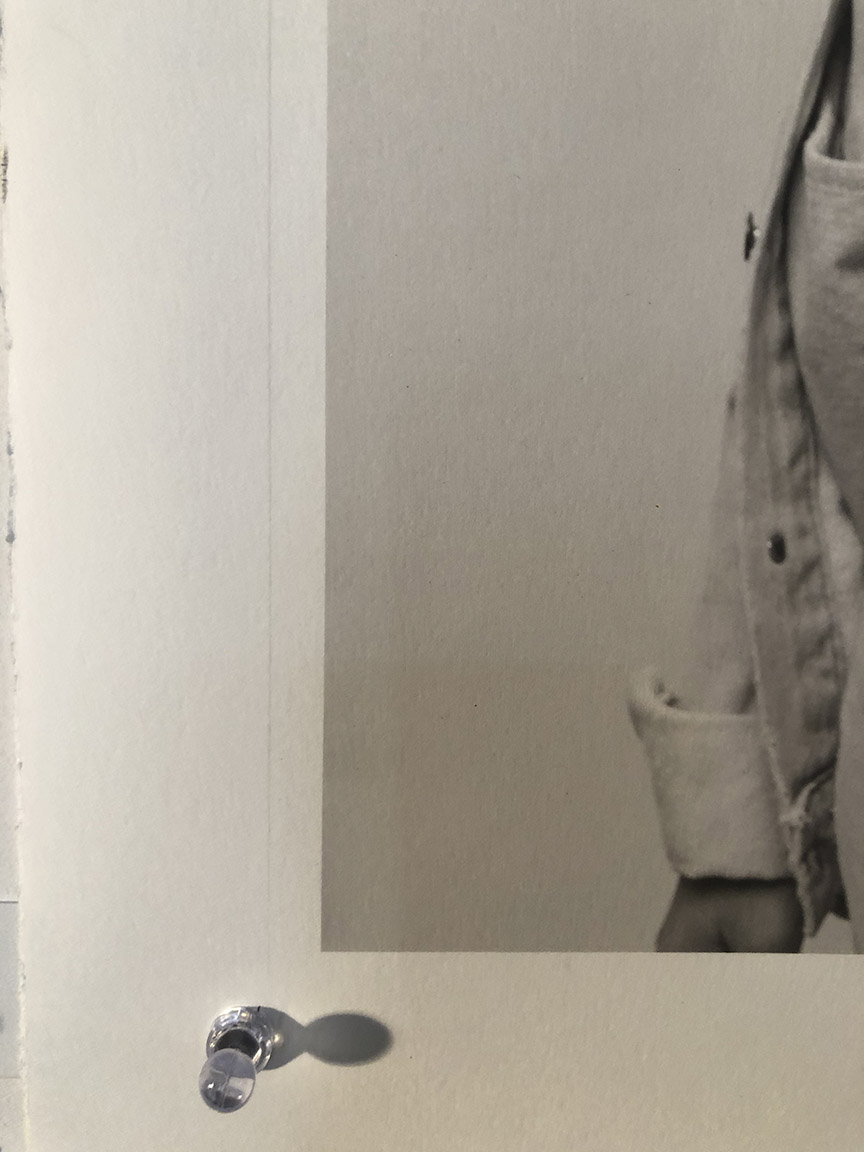
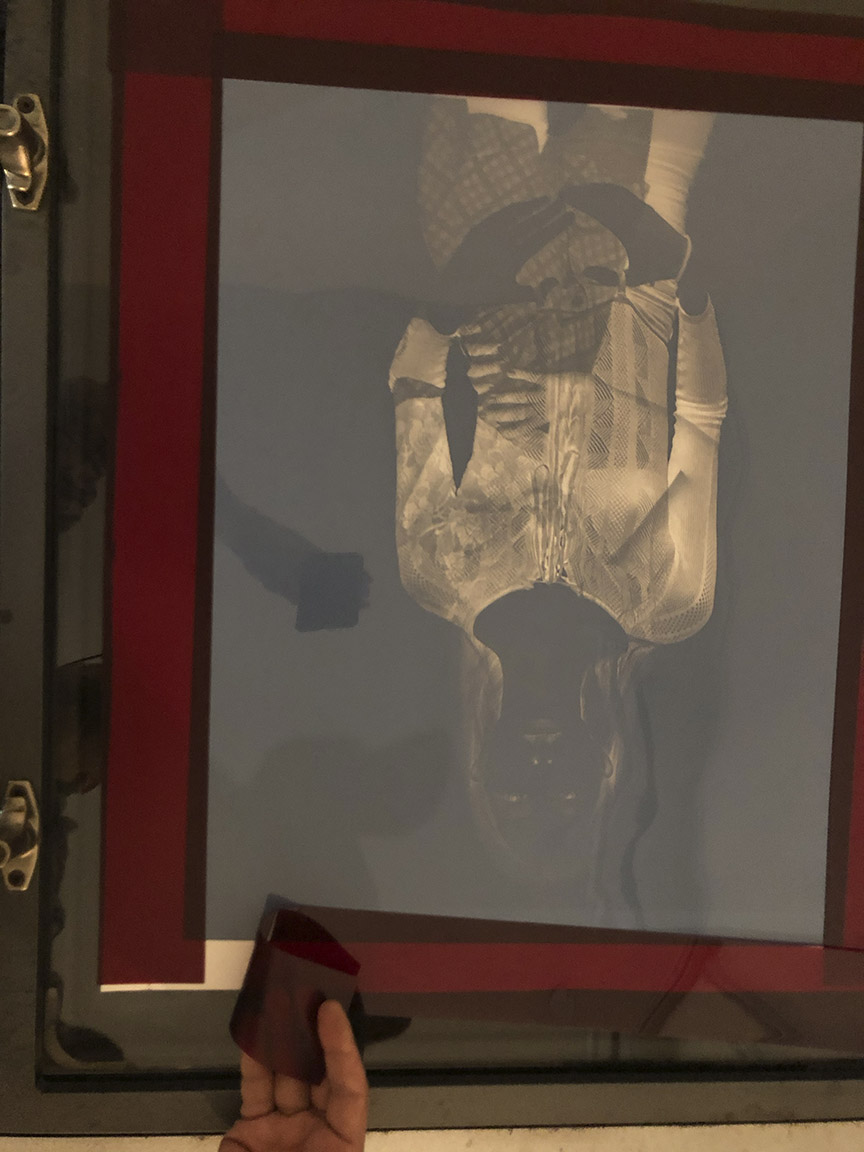
However, that “line” that I described is clearly visible when the paper is dry. I’m printing 16x20" images on 22x24 paper. But my neg printer is only 17" wide, so the black margin on the neg does not cover the entire paper. This is why I am using strips of Rubylith to cover the paper to the edges. This line occurs at the edge of the black neg border where it meets the Rubylith. The Rubylith overlaps the neg in the exposure device. Attached is an image of the setup and the print.
Could it be that light is traveling along the top substrate of the Pictorico film and then exposing the paper at the edge of the neg? ie getting underneath the Rubylith? I am using a pretty strong vacuum frame during exposure, so the paper actually has an impression on it where the neg ends. The edge of the neg is physically pressed into the paper. The line is more than a “blind” impression though. It is a clear exposure line. I uploaded and image of this too.
this looks like it should be totally fine. Only thing I could think is that somehow the PK is off, or nozzles are off if the density of the black is weak.
Oh man! I think Walker is right – we both were misreading your verbal description. Should have asked for pictures sooner. They clarify some things, but also raise a few more questions.
I don’t think this is fog at all, rather it is a shadow where the light is being piped along either rubylith base, film base, or both, and creating a shadow along the film edge. I see this sometimes when printing large-format film negatives that are over-exposed and/or over-developed sufficiently that they require a good bit more printing exposure than “normal” negs made for Pt/Pd printing. I usually mask my edges with rubylith and in this situation enough light makes it out to the edge of the film to leave a shadow of the film edge. Sometimes I can even make out the notch code. I actually like the effect, but it is impossible to get it to happen consistently.
Also worth noting is that a “point-source” plateburner type of light minimizes or eliminates this issue compared to a diffuse light source such as a fluorescent or LED array. At least that is my experience from long ago.
My new questions:
Are you placing the rubylith ruby-side down? (Base-side up?)
Do I guess correctly that you are printing your 16x20 images on 17x22 film and therefore don’t have sufficient film margin to print a full-black masking edge? (I don’t see a black edge in the picture except maybe on the bottom.)
Could you possibly reduce the image size to something like 15x19 to allow for a 1/2 inch masking edge?
Alternatively, cutting 17x23 or17x24 inch sheets off of a 17"-wide roll could allow you to maintain your 16x20 image size and print a 1/4" masking edge on the sides and more if desired top and bottom. I think QTR will print to 1/8" of the film edge on the sides even if you set it up to print full-bleed. You will still need appropriate leading and trailing margins depending upon your particular printer, probably 1/2 inch at top and 1.5 inches at bottom. When figuring these margins be sure to include the printed masking edge as part of the image size.
Walker’s suggestion of placing the rubylith under the film will probably work, but doing that physically raises the edge of the film image off of the paper so you will likely get a slightly soft print image edge, which may or may not be a problem.
the fogging does exist, as described, but I just never sent a picture of it. It is very very faint, and is not measurable/visible when the paper is dry, (although very visible when the paper is wet). I put this issue on the backburner since it is not much of a problem when the paper is dry.
The line is a separate (and annoying issue). But the suggestion to put the Rubylith underneath the negative does the job. The negative is 17" wide, with a 1/2" black border. The vacuum is strong enough to pull the actual image flat to the paper, so no loss of edge sharpness. It’s difficult to place the Rubylith under the negative so that it doesn’t cover any image, but it can be done. Problem solved and better than buying a wider printer!
Keith’s comments about the total amount of UV made me think about my base exposure. It turns out that I can get a better print DMax by increasing exposure, and I did new tests and ended up with a base exposure about 4x as long as before.
But…after linearizing for the new time, I have a white point that is slightly darker than before.
How can I add some density to the black on my neg? Can I manually adjust the curve but adding a few 1000s to the first K channel number?