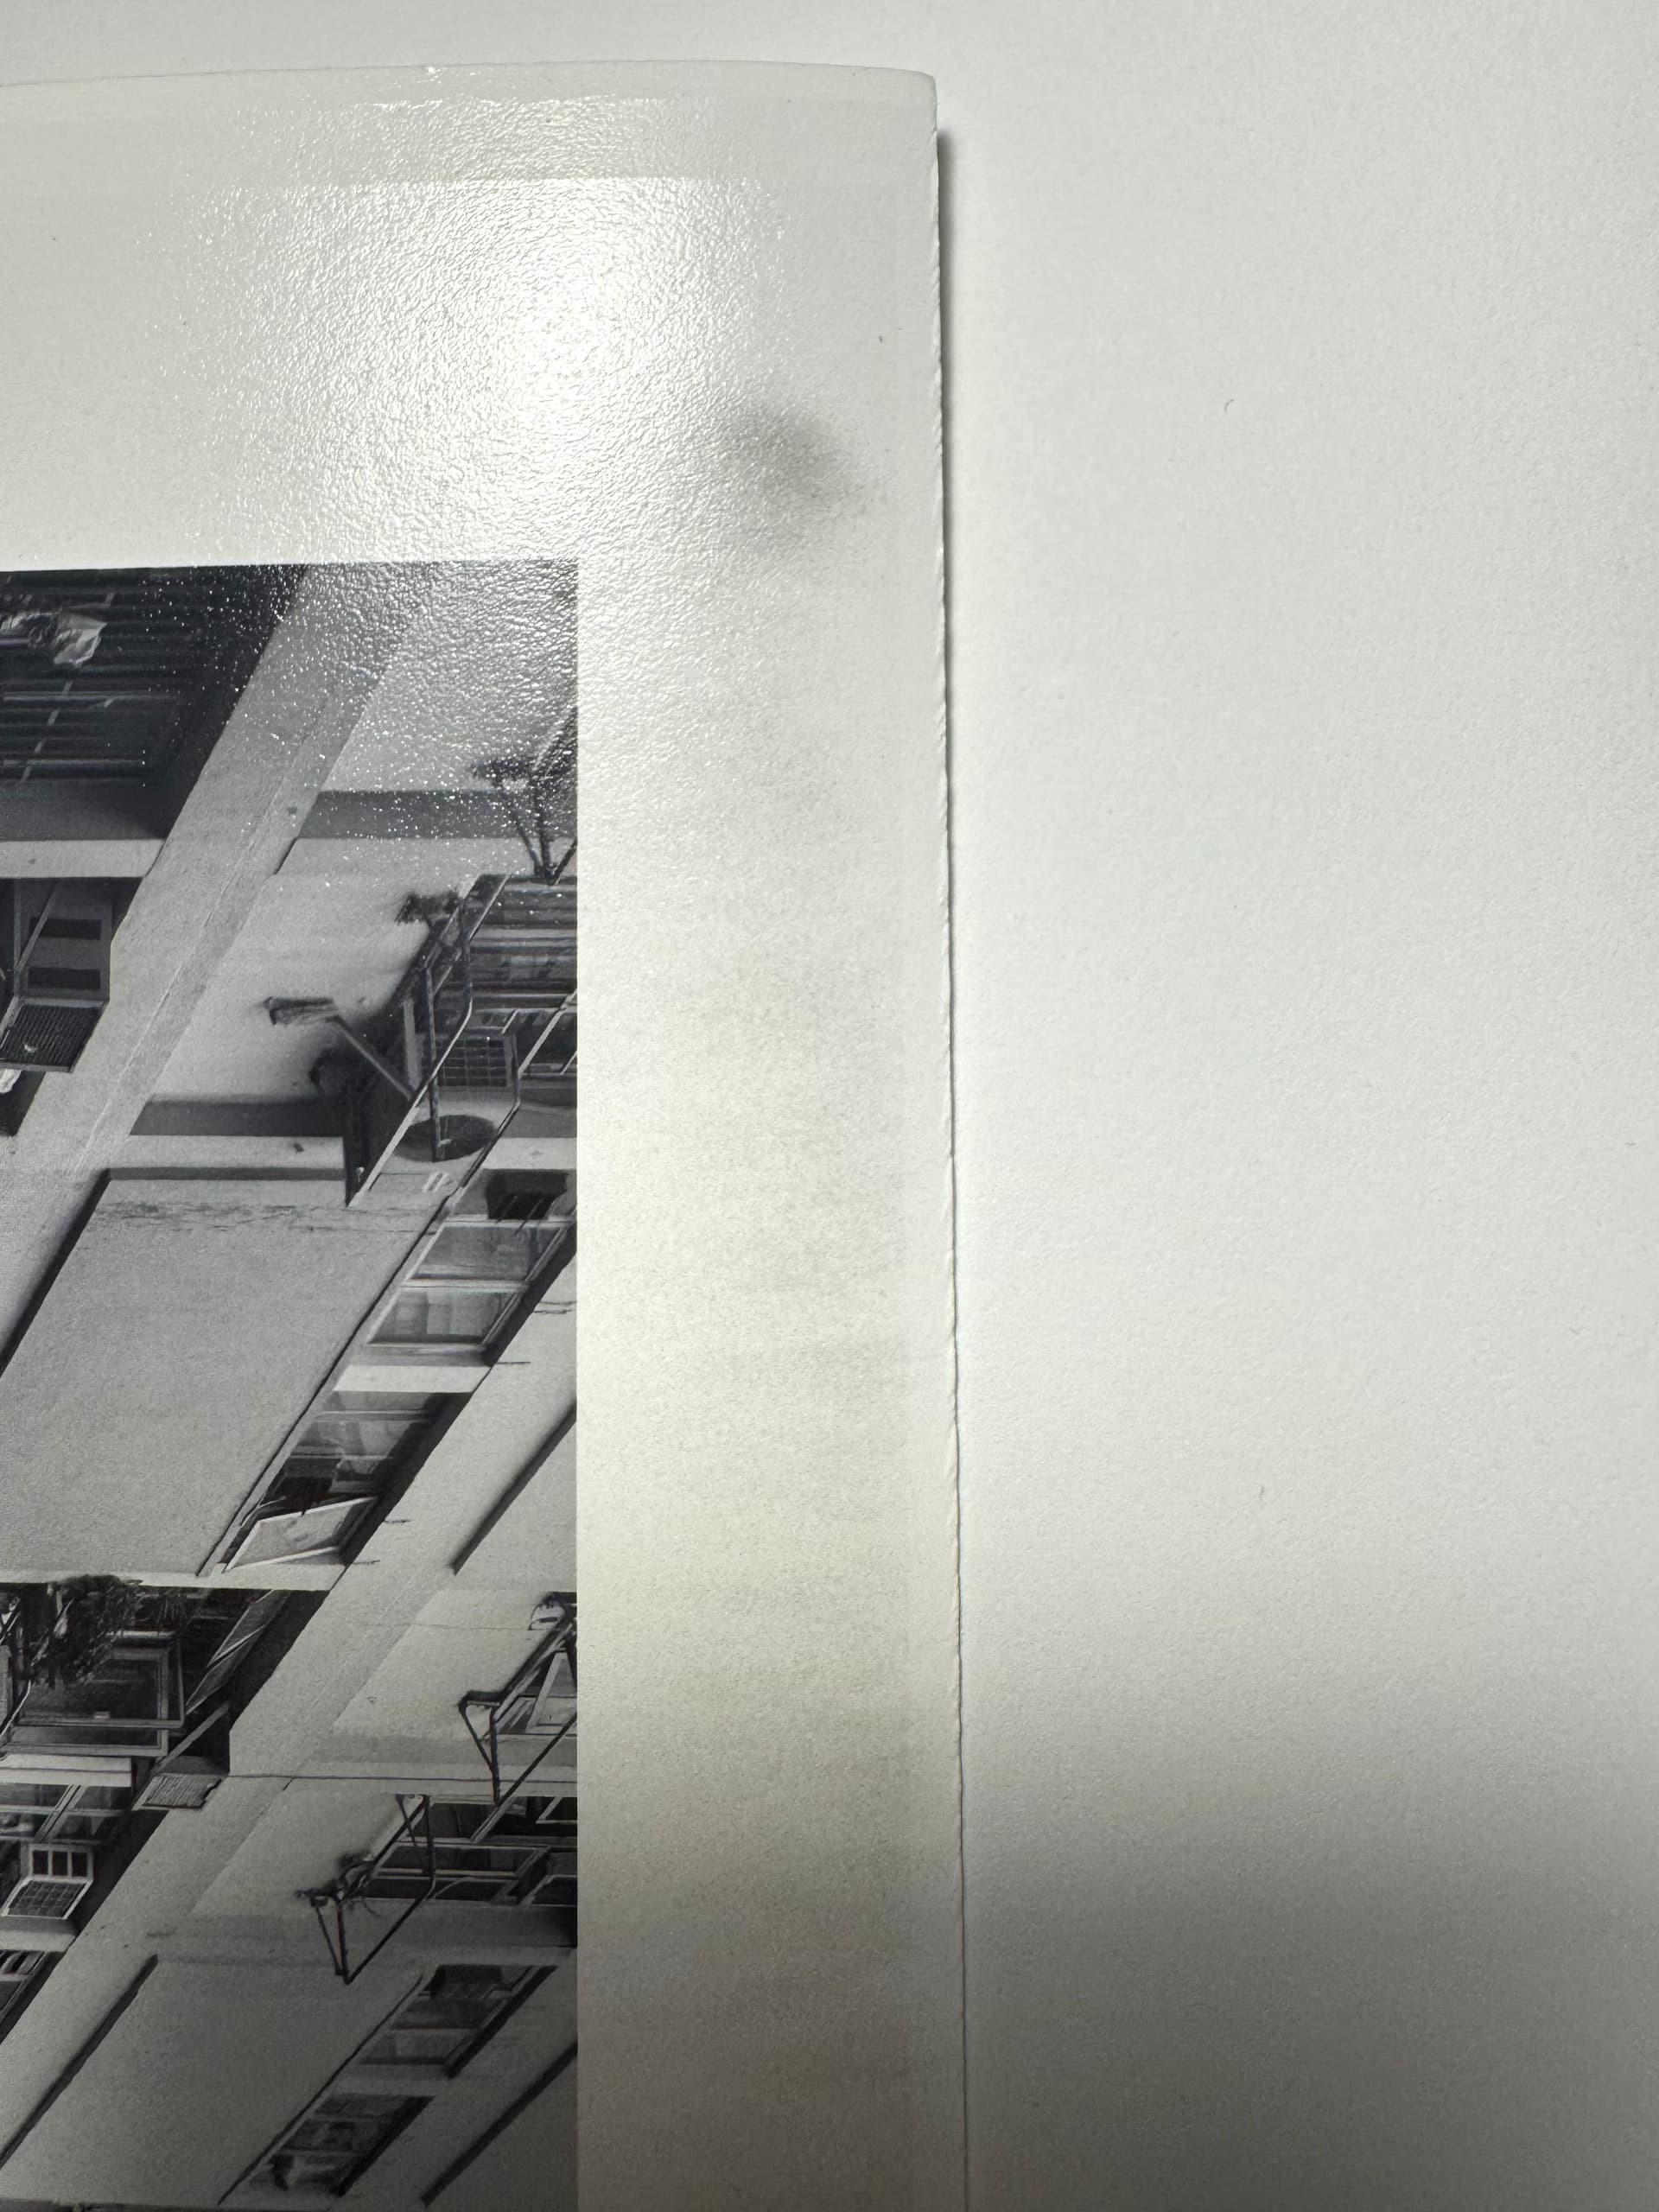
I am trying to print on Hahnemühle Photo Rag Baryta and am encountering the following problem: Whenever I choose a glossy curve-set (same for other papers), I get a dark tone on the edge of the paper, which should stay white. I tried zeroing out all channels including GO, but the tone remains. When I print on matte paper, everything is clean. This is happening on an Epson SC P908 with Piezography Pro inks. Ink also sprays into the printer right in front of the edge of the paper. I am using PrintTool and QTR on a Mac Pro. The printer is in good shape and all ink channels are printing as they should - just to be clear as it seems a similar problem was mentioned in an earlier post and was due to irregular print patterns.
Oh that is annoying!!
I will try and help you with that.
What are the name of the curves you are using when this happens?
Rachel
IJM-TechSupport
Thank you so much for the quick response. The curve names I tried predominantly are:
P900-Hahn-PhoRagBaryta-Cool.quad
P900-Hahn-PhoRagBaryta-Neutral.quad
P900-Hahn-PhoRagBaryta-Warm.quad
Just to compare I tried other glossy curves, which had the same effect. This appears in warm, neutral, and cool tones. The curves I am using are from a set of Pro curves for the Epson SC P900 that Jon sent me. Below is an image showing the effect.
It sounds like you’re dealing with contamination in your Gloss Chromatic Optimizer (GCO). This typically means a small amount of pigment has mixed with the clear GCO, causing a slight tint.
Here’s a breakdown of the potential causes and steps to resolve it:
Potential Sources of Contamination
-
Cartridge Filling:
- Syringe Reuse: If you used a syringe that previously held Piezography ink (a pigmented shade) to fill the GCO in your Light Light Black (LLK) cartridge, you might have introduced a small amount of pigment. You could compare GCO from the cartridge and bottle with a few drops of each on a non-matte surface and compare under strong light. Both should be clear. If the cartridge ink is stained drain it, rinse with distilled water and drain it again. Fill with fresh GCO using a clean syringe.
-
Initial Printer Setup (If you used Epson inks first):
- If you installed Piezography cartridges after using the original EPSON inks without flushing the system first, the residual LLK pigment from the EPSON ink might still be in the LLK line. Run 3-8 Power Cleans until it clears up. Or you can print just a blank page setup in PrintTool with the same curves and the GCO will be the only ink printing and you can monitor sheet by sheet until it clears. Page Setup in PrintTool is considered pixel value 255,255,255 and this is why GCO prints over the entire paper.
-
New Printer Defect (Least Common):
- If this is a brand-new P900 that never had EPSON inks installed, and you’re sure you didn’t contaminate the GCO while filling the cartridge, the issue could be a defective capping/cleaning station. This part might be picking up waste ink and introducing it into the LLK channel. However in this rare case the contamination would only occur at the beginning of a print and clear before the end of the print. However, if you installed the EPSON cartridges back into the printer it would not be noticeable in the LLK. So this is a use outside EPSON use of their printer and no warranty would apply were you to explain to EPSON the problem. But this is probably highly unlikely and the cause just a simple contamination.
Let us know what you find.
Rachel
IJM-TechSupport
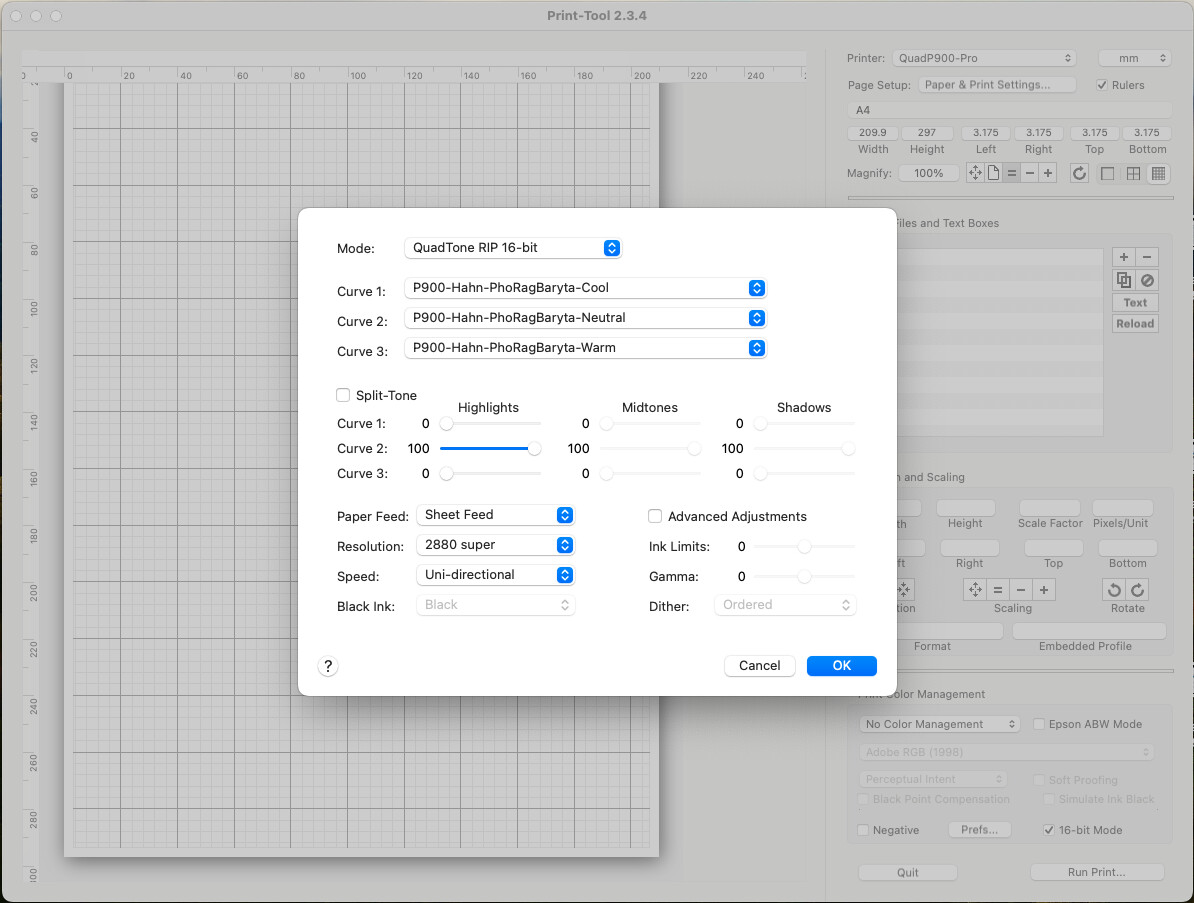
Just reading through this I can think of one other reason but only if you find that the GCO is not contaminated in the printer nor the cartridge. It could be possible that you are not using PrintTool or QuadTone RIP as we instruct in the Piezography manual. You would need post us a screen grab of your PrintTool in its entirety with a print setup that does this, as well as the QuadTone RIP settings which do this.
Possibly I may spot something…
best,
Jon
Hi Rachel and Jon, thank you for the suggestions. Indeed, it is the capping station that introduces the grey tone. I cleaned it and was able to make a nice clean print. Unfortunately, about an hour later the tone is back. I assume that one of my cartridges is slowly seeping ink into the capping station, but I have not been able to tell which one it is so far.
I am also attaching a screenshot of my PrintTool and QTR settings, just in case I am overlooking something.
Thank you for your help!
Best,
Andreas
Hi Andreas,
It appears that cleaning the affected area of your printer provided temporary relief, but the issue has returned, strongly suggesting a drainage problem.
One of the more important components responsible for managing waste ink is the capping station. It performs two key functions:
-
It uses a pump to draw (or “pull”) waste ink from the print head during cleaning cycles.
-
It forms an airtight seal over the print head when idle to prevent the nozzles from drying out.
The waste ink collected by the capping station is then routed through a drain tube into the maintenance waste ink system (or waste pad/tank). For the system to work correctly, this drain tube must allow the contents to flow freely.
Based on the recurring nature of the problem, you are likely looking at two main possibilities:
-
A Clogged Waste Ink Tube**:** The drain tube is plugged, or it has a kink/tight bend preventing proper flow.
-
A Pump Malfunction**:** The pump associated with the capping station is not operating correctly or efficiently.
If you are comfortable with light disassembly and maintenance:
-
You can test the drain tube by gently applying a small amount of cleaning solution (like PiezoFlush) directly into the capping station to see if it drains. If it doesn’t, removing the housing to inspect the tube for any kinks or tight bends and simply manipulating it may be enough to resolve a manufacturing-related issue.
-
Replace the Capping Station**:** The capping station often comes pre-attached to its drain tube. As a dedicated part, replacing the entire capping station might resolve the issue if there is a subtle defect in the part or its tube.
-
Check the Pump**:** If the above steps don’t resolve the issue, the pump itself is the next likely culprit. You would need to consult your printer’s Field Service Manual to accurately locate and test or replace the capping station pump.
This type of problem is common with printers that are older or that have made 1000s of prints and cleaning the capping station, wiper blade and flush box as we demonstrate in our videos is very effective. In your case, I am thinking more of a defect preventing draining because your printer is so new. The cartridges are pressurized and were you to have a leak it would show during printing as dripping.
Rachel
IJM-TechSupport
Hi Rachel,
It took me a while to get back here. I thought I should post the solution to the problems I described earlier.
I figured, the problem only appears when I use format presets. Once I enter the paper format as a user defined size, everything is clean. Maybe this is a quirk specific to the P908.
Thank you.
Best,
Andreas
Thanks for sharing this SOLVE with the Community!
I’ve not come across anything like that.
Rachel